How to Access Home Assistant From Any Where For Free
Updated on 6th Oct 2020 17:38 in DIY, Home Assistant, Tutorial
Home Assistant is a popular DIY platform for building a smart home. It allows the use of almost any smart device in the world via the integrations that are either part of the core software or released by the community. Unlike many of the other smart home controllers, there is no cloud-based solution allowing remote access provided out of the box*. That's why we are going to be walking through the process of setting up remote access in Home Assistant, step by step.
*They do have a cloud offering, though it requires a subscription fee

Table of Contents
What is remote access?
While this may be obvious to some, remote access is the feature that allows users to control their home from outside the local network over the internet. Most commercial hubs simply have a cloud service that accepts your commands and forwards them to your home, but since Home Assistant is the server, there are a few extra steps to take. There are many reasons to enable remote access, from being able to control the climate while away to monitoring sensors or trigger automations. Remote access will require some configuration, however.
How does it work?
The principle is quite simple. It involves "forwarding" a port on your router to the outside world which effectively makes that port open for external traffic to flow in. Then when you use your public IP address, you will be connected to the correct computer within your network. Imagine that the forwarding is creating a mapping between a port on the public side of your network (your external IP) and the private side. When traffic arrives at the port you forwarded, it will be sent to the location you specified within your network.
The default action for most consumer routers is to block any incoming traffic, which is why it is necessary to do this. Unfortunately, many users will still have a problem: the external IP is not static. There are a select few who do not suffer from this, but the vast majority do as IPv4 addresses are limited, making ISPs careful with them. The result is that your public IP probably changes quite often. You would either need to remember a new IP every time it changes or the real solution, which is to automate the updates.
Dynamic DNS
DNS stands for Domain Name System and is responsible for transforming names such as "wltd.org" into an IP address which can actually be used by a computer. Dynamic DNS is then the same system but with an added feature causing a specified record in the table to be continuously updated to the latest IP. This way, when your IP changes the name will already be pointing to the right place. How can it do this? A computer within your private network will run a program that frequently updates the IP address of the DNS record.
internal devices accessible
from outside
Before starting checklist
Before you begin, you will need to have a few things on hand. Notably:
- The IP address of your Home Assistant instance
- The model and IP address of your router
The IP of your Home Assistant instance is not "homeassistant.local", it should be an IP like this one "192.168.1.25". If you do not know the address of your instance, you can open a command prompt under windows and use the ping command as follows to find it:
ping homeassistant.local
This will list the IP of the host after it responds. Next, you need to know the model and address of your router. Commonly these will be located at "192.168.1.1" or "192.168.0.1", but it could be different, so look up your model to find out what the default address is.
Carrier-Grade NAT
CG-NAT is an increasingly common technique that involves putting multiple customers under the same public IP address. It is not trivial to determine if your ISP (Internet Service Provider) does this, but a search for their name and "carrier-grade NAT" should yield some results about whether they are using this technique or not. This method is almost the same as what happens in your home: the carrier has a "big router" that maps many customers to 1 public IP.
The problem with this is that just like how you had to forward a port in your router for a computer on your network to be accessible from outside, you would need to do the same in the ISP's router. Any traffic coming in from the outside will now be blocked at the provider's router as it would be at your router before you forward any port. As you can't forward a port in the ISP's network, there are not too many things to do at this point.
Many companies will charge money to obtain a "real" public IP so be sure to check if they offer this as an option. In the case that they don't, there is another method to get around this problem. By using an external server which can be rented, such as a VPS (Virtual Private Server), you can create a bridge between your network and the outside world. The computer running Home Assistant will establish a connection called a "tunnel" to the VPS, which is allowed as it is an outwards connection. Then the VPS is configured to direct traffic it receives into the tunnel, enabling remote access.
The benefit is you don't need dynamic DNS as the tunnel will take care of that! The downside is that the server will cost money and tunnel creation isn't simple. This is an excellent place to start if this problem affects you, it's quite technical, but the only other option is to pay for a cloud service, which is virtually the same thing but configured by someone else.
configurations, but demonstrates the idea.
Setting it all up
In this section, we are going to perform the actual setup. There are several ways to do the dynamic DNS step, but the port forwarding step should be fairly ubiquitous.
Forwarding the port
There are a lot of routers on the market, and the method for forwarding a port varies immensely depending on which one you have. As a result, it is best to search for "<router model> port forwarding" to find instructions relevant to your specific device. The general idea is to head into the firewall/NAT settings and to click on the port forwarding tab. Then set the external port to something like 80 (HTTP) and 443 (HTTPS), you will probably need two entries to enter them one at a time.
Next, select "Both" for protocols, put the IP address of the Home Assistant instance and enter "8123" as the local port. Finally, click on save or submit to make the changes permanent. Below is a picture of the configuration in my router just for port 80 - you should really use port 443 to force the use of SSL though. This router is a Ubiquiti EdgeMax which is not a consumer router. As a result, your page may look different.

Note on consumer routers.
It must be said: routers provided by ISPs are not always the best you can get and in some cases are very limited. We always recommend users get a higher grade router such as one made by Ubiquiti or another commercial manufacturer. The reason is that for a relatively small amount of extra money, a far superior product can be obtained. This is especially true if you are interested in smart homes as they tend to push the boundaries of what is considered "normal" for consumer equipment.
Installing the DuckDNS add-on
Note: If you have your own domain name and want to use it to access your Home Assistance instance remotely, skip this section and head over to the Using a DNS provider section.
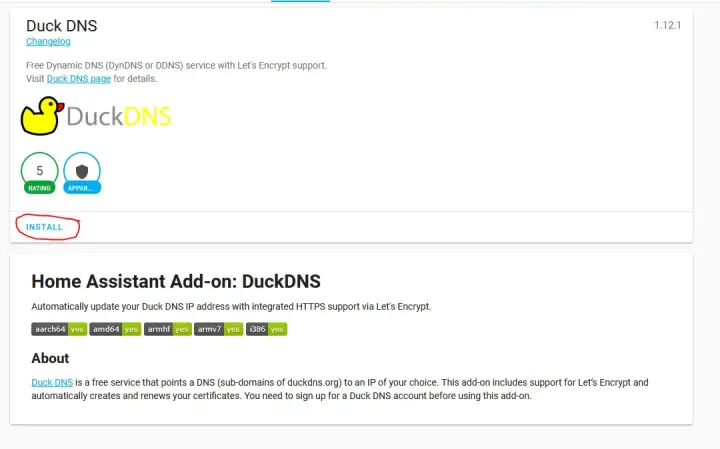
It is now time to install the DuckDNS add-on which will update your assigned sub-domain to always point to the correct address. In the Home Assistant UI, click on the "Supervisor" tab in the left menu. Then click on the "Add-on store" tab. Search or click on "Duck DNS", then click "Install".

Once the add-on is installed, you will have a configuration tab in the top menu. Either use the "Documentation" tab or visit the Github repository with the installation instructions here. Using this you will configure both the dynamic DNS and the Letsencrypt SSL certificate as the add-on also manages encryption for you.
Using a DNS provider
If you have a registered domain name, you might have a DNS provider like Cloudflare or Namecheap. There are solutions for these providers too. Find your provider in the table below and install the relevant integration.
| Provider Name | Integration |
| Cloudflare | Cloudflare Integration |
| Google Domains | Google Domains Integration |
| Namecheap | Namecheap Integration |
| No-IP.com | No-IP.com Integration |
| FreeDNS | FreeDNS Integration |
These integrations will update the DNS record you specify at your preferred provider. Please note that most of these are not free and you will need a domain name registered to use them. Regardless, considering it only costs a few dollars a year, it can be an excellent way to make your smart home experience a bit better.
Do not forget to secure your system with SSL! You will need to do this your self if you are using these integrations as unlike the DuckDNS add-on, they don't provide certificate management. To do this, you can either install certbot on the Home Assistant host or use the "Let's Encrypt" add-on to manage the certificates.
Securing the system
This is critical. When you expose a computer to the outside world, it becomes almost sure that it will be attacked by hackers or bots. Bad actors run bots that attempt to use known exploits on any public IP address they can find, so if your system is vulnerable, you will get hacked. Given that you now have a path directly into your home network where potentially sensitive information lives, you must take time to understand basic security principles.
Home Assistant provides a checklist of things you should do to increase the security of your system. Probably the most important thing is to keep the system up to date. The reality is that software has bugs in it, and in some cases, no one thought it was even a problem. This happens all the time and hackers take advantage of these bugs to get into the systems of people who haven't updated their software. Once you make the instance accessible from the outside, you must keep it up to date, especially when there is a security update.
Since we are talking about security, one thing that many people do to reduce the risk of having a publically facing system is to use a rock-solid web server like Apache or NGINX as a proxy. This reduces the risk by using software that is battle-tested and well maintained to face the world while Home Assistant can sit behind it. It's important to know that this doesn't mean that you can't get hacked, any flaw in Home Assistant will still allow bad things to happen. So be sure to always update the software!
Additionally, using this configuration allows you to run multiple services inside your home on the same port using virtual hosts. It is outside the scope of this article, but know that it is possible and web servers are the answer. The take away from this section should be to be very careful with security in your smart home. It's great to have control of everything, but you need to take steps to maintain that control.


