How To Build A Smart Home Network - A Complete Guide
Updated on 14th Mar 2022 17:37 in DIY, General, Smart
As smart home technology keeps getting more sophisticated, the importance of having a good home network can not be overstated. Taking a quick look at what's available on the smart market, it becomes evident that the overwhelming majority of devices use WiFi. There are several reasons manufacturers keep moving in this direction, but the side effect is that traditional consumer-level networking equipment quickly becomes inadequate. This article is my complete guide to setting up your home network to best support your goal of an ever more intelligent home.
Table of Contents
Disclaimer: This post contains affiliate links. As an Amazon Associate, I earn from qualifying purchases.
Why do smart devices strain home networks?
One of the most important things to understand about wireless networks is that they have physical limits that dictate what kind of performance you should expect from a given situation. Arguably, the most critical limit for smart homes is that sending data back and forwards occupies airspace, which is extremely limited in practice. For some context, there are 14 possible channels for 2.4GHz WiFi, of which only three do not overlap. To make the situation worse, each country has different restrictions on some of these channels, bringing the number down to 11 for the US and 13 for Europe.
It's crucial to keep in mind that only one device can be transmitting data on a given channel at a time, which is how they can communicate clearly and without interference. Without getting too deep into the details of radiofrequency (RF) technology, channels that overlap are not very useful for networking as they will interfere with each other. Interference is very bad as it causes some packets to be corrupted, requiring them to be sent again, which causes significant slowdowns or "lag". To make matters worse, anyone living near many others (apartments, city cores, even residential neighbourhoods) will also experience interference from nearby WiFi networks.
The only solution to interference like this is to carefully select the channels to avoid the already heavily used ones. With only 3 to choose from for 2.4GHz networks, it's easy to see how this will become a problem. Using a 5GHz network resolves many of these issues, but it still has its issues, and most smart devices simply don't support it. Another potential source of interference is other electrical equipment that isn't using WiFi but uses a similar frequency, such as microwave ovens. All of this combined makes a less than ideal starting situation for smart home devices.
We can see that WiFi itself has a few issues, to begin with, but how do smart devices make it worse? The short answer lies with the sheer quantity of devices smart homes end up with. Imagine changing every bulb in your home to a smart bulb. Suddenly, you have 30-60 WiFi clients that didn't exist before. This is where the one-at-a-time transmission scheme becomes a problem because you have potentially dozens of devices trying to use the network at the same time. What happens next is that a group of your bulbs attempt to reach their controller while you might be using your computer, phone, tablet, TV, etc., and you end up with tons of competition for who gets to use the channel.
The process generally used to resolve this situation is called Carrier-sense multiple access with collision avoidance (CSMA/CA) which, while being a mouthful, is the reason modern WiFi works at all. It is not a simple process, but you can understand it at a surface level by recognizing that it acts as a mediator that gives speaking permission to a single client no matter how many are attempting to speak at the same time. The result of this is that while one client (such as a smart bulb) is sending or receiving data, the others need to wait their turn to do the same. This effectively creates a lineup where the size is dependent on how many WiFi devices are online at the same time.
No one wants to have unresponsive smart devices, so they are usually quite aggressive with their network communications to mitigate any delays between the controller and the physical device. This is good for keeping you happy when you use your phone to turn off the lights or view sensor data, but bad for the overall WiFi network since it increases the congestion on the airwaves. As such, we can see that a higher number of WiFi devices is directly correlated with poorer network performance. Even the best networking equipment has this physical limit, although it usually takes a lot more to see negative effects.
What about mesh networking?
Mesh networks are a hot topic in the smart home industry precisely because so many devices rely on WiFi connectivity. The main issue mesh networking resolves is range. When most people think about mesh networking, they are thinking about a system where each node participates in helping messages reach the destination. This means that a light bulb on your main floor can facilitate communication between your smart lock on the second floor and the controller in the basement. Despite the name, most mesh WiFi solutions are not truly a mesh in the same way the previous example was. That's because they form a mesh between the access points, which allows them to be positioned around the house without the need for wiring them all together.
Functionally, that's no different to how many enterprise/public WiFi networks operate. Virtually every large network will have several access points (AP) that use the same WiFi SSID (name). The benefit of doing this is that each AP handles its own clients, which now spreads the load and makes it easier to manage. Large public networks usually use Ethernet to link the various APs together at a central point, usually the router. Mesh WiFi simply removes the need for this wiring, as the APs talk directly to each other via wireless communication. While this often does help network performance, the outcome is largely dependent on what kind of interference is at play.
To keep the interference in check, each access point within range of each other needs to use a different channel, which will prove to be difficult when there are only three available. This is why products that advertise ultimate solutions to WiFi problems with mesh networking are not the be-all-end-all. They are definitely more convenient, but they do not eliminate the need to carefully plan your smart home networking.
While we're on the topic, we should mention that "real" mesh networks like Zigbee or Z-Wave exist and are generally a good solution to the problems we are discussing in this article. Check out my article on Why Zigbee Needs To Be Part Of Your Smart Home and Is Z-Wave Dead? 3 Reasons Why It's Not for more details on how these technologies can benefit you.
How to plan your smart home network
Now that we have gone over the most critical problems smart homes encounter with networking, we are ready to plan to build the perfect smart home network. There are differing priorities for everyone, so this should be taken as a general guideline rather than absolute instructions. With that said, I believe this strategy will serve you well, even if it isn't specifically optimized for your use case.
Step 0 - Network Requirements
The first step in planning your network is determining what it needs to do. Of course, we want a rough idea of what it will look like in the end, and in my experience, it's best to start with what you need it to do. To get started, think about the following points and reflect on how they might influence your decisions later on.
- How many devices will be connected to the network?
- How important is high-speed internet?
- Do you plan to use a Network Attached Storage (NAS) server?
- Are there a lot of nearby WiFi networks?
- How big is your home, and how far do you need the network to reach?
- How much money are you willing to spend?
- Is your home wired for Ethernet?
The most important thing is to get a grasp of the current situation and find out what your eventual ideal network is. The reason is that networking equipment can be pretty expensive, so you should try to plan ahead so you can get the right stuff in the first place, rather than needing to upgrade everything constantly. Standard 1Gbit/s consumer networking equipment is more than enough for most people, but this changes if you want blazing fast internet or plan to use a NAS.
For example, I recently moved and took the time to take care of my home network. My new internet plan offers 1.5Gbit/s speeds, which would be rather useless if the router immediately brought it down to 1Gbit/s. I also knew I would be setting up a NAS to keep all my files backed up. Basically, once a high bandwidth application like file storage, video streaming, game streaming, etc., comes into play, it's best to get the network speeds as high as possible. Similarly, file storage can turn into a pretty unpleasant experience with a slow network, so I opted to set up a 10Gbit/s network in my case.
On the other hand, if you plan to primarily use WiFi to browse the internet, manage your smart home, and don't have any demanding applications, you might even get away with using your ISP's router! I would caution against this for most situations, though, as they are often less than stellar and can cause some problems down the line. Even so, using a decently cheap router should get the job done just fine!
We obviously can't go over every aspect of planning a network, but we can briefly mention a couple of other factors that you should keep in mind.
- A wired connection is always better than wireless
- The location of your router/access point is a deciding factor for the range it will cover
- Low latency applications, like video games, are far more sensitive to issues caused by cheaper equipment
- Good equipment usually lasts a long time
Step 1 - The Router

The router is the core of the network. It is responsible for routing the traffic to the right place, hence the name. An important distinction is that the router mainly handles traffic travelling outside the local network, while a switch handles local traffic. Some routers are "all-in-one", meaning they are a router, a switch, and a wireless access point all in one. This is mainly done for convenience, but it has led to confusion about the various roles within a network. You usually only have one router per network, though there are some configurations where more are used.
You will want to make sure that your router is good as it acts as the main controller of your network. All internet traffic winds up here, and you will cause yourself more pain than it's worth if you get one that's too weak. There are a lot of options when it comes to routers. In fact, there are so many that trying to pick the best one will make your head spin. For that reason, forget about what the "best" is and instead focus on what will meet your needs while possibly also offering some extra convenience features.
Ubiquiti Dream Machine
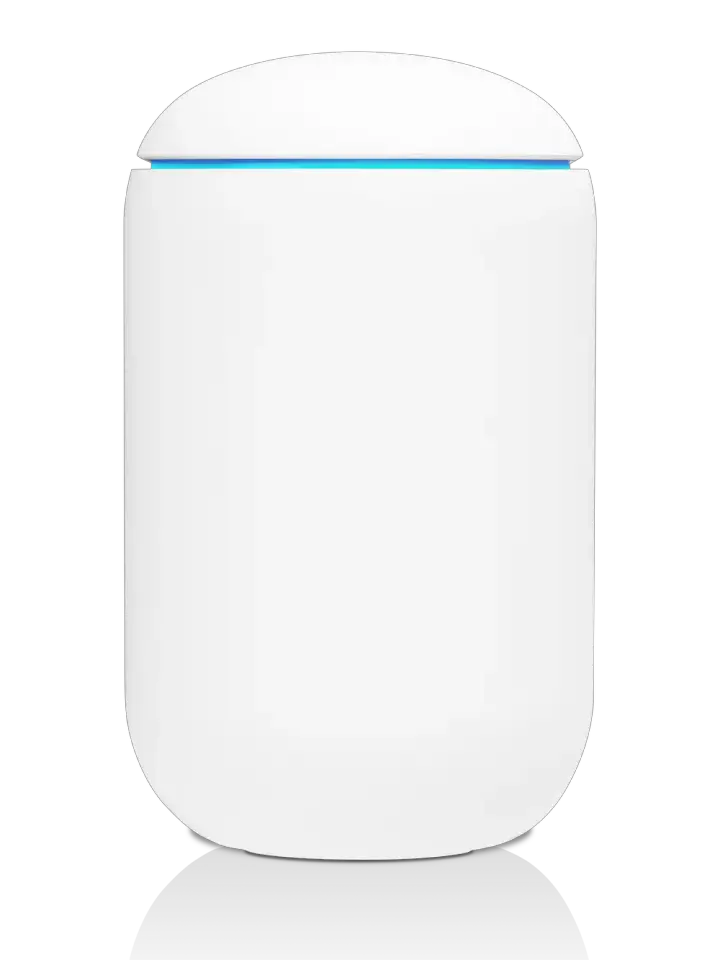
First, let's take a look at one of the best routers aimed at consumers. The Ubiquiti Dream Machine is an easy to use all-in-one router that comes with 4 LAN ports on the back and a built-in WiFi access point. It has many advantages, but one of the biggest is that it uses Ubiquiti's UniFi management software which makes it easy to manage. You can use the (free) software to manage your entire network, including any supported switches, cameras, access points, etc. Another advantage is that it has a powerful processor, which allows it to handle most common household applications. It does come with internet threat management (IDS) along with deep packet inspection (for analytics & blocking websites), but you should be warned that there is a significant performance penalty when these are enabled.
Pros
- Relatively inexpensive
- Includes a WiFi access point
- Includes a four-port 1Gbit/s switch
Cons
- Limited scalability (will need to be replaced to handle faster than 1Gbit/s)
- Built-in WiFi means you can't position it optimally and connect it to your modem
Check out the Dream Machine at Ubiquiti here!
Ubiquiti Dream Machine Pro
If the Dream Machine was good, you know that the Ubiquiti Dream Machine Pro (UDM Pro) would be even better. It is definitely impressive with its eight 1Gbit/s ports, two 10Gbit/s ports, built-in DVR slot, and bonkers processing capabilities. If you have never dealt with rack-mounted hardware, the idea can be a little bit scary - but believe me, it does just fine sat on a table. It is also not a full depth 1U form factor, which, combined with its relatively lightweight, makes it much easier to manage than a typical server. It also features the whole Unifi experience you would get from the non-pro version, though it has many configurable options for advanced users.
For me, the most significant selling point was the inclusion of 2 SFP+ ports, which allow you to connect a transceiver that supports either copper or fiber connections (more on fiber in a bit). While the other ports on the UDM Pro are limited to 1Gbit/s and a copper connection, they can still be helpful for devices that you want wired in but don't require exceptionally high throughput. An example could be a Raspberry Pi, which usually doesn't support higher speeds without additional hardware.
You might be wondering, if you only have two 10Gbit/s ports, are you only going to be able to use a single device at that speed? Without an additional switch, that is indeed a limitation. One port will be used for your uplink to a modem/internet, and the other can be for your 10Gbit/s network. We will see how a switch can help with this situation in Step 3 - Network Switches.
Pros
- Supports 10Gbit/s transfer rates to the internet and internally
- Includes a built-in Network Video Recorder (NVR) for Ubiquiti IP cameras
- A small screen displays status information directly on the front of the unit
- Has eight 1Gbit/s ports
- Can be powered with a Ubiquiti power supply to add Uninterruptable Power Supply (UPS) features
- Supports advanced networking features
Cons
- A bit on the expensive side
- Only has 2 SFP+ ports, which are the ones that can go up to 10Gbit/s
- Requires SFP+ transceivers for 10Gbit/s
Check out the Ubiquiti Dream Machine Pro on Amazon here!
Step 2 - Wireless Access Points

Wireless access is what all the networking hype is about. All you need to do to see that this is the case is to look at just how many smart devices rely on WiFi. For further confirmation, you may have noticed that many people will refer to a Local Area Network (LAN) simply as your "WiFi". While this phenomenon is not relevant to smart networking, it goes to show that our world has become entirely dependent on wireless access - specifically WiFi. As such, it's more important now than ever to ensure good wireless connectivity throughout your home - especially when building a smart home.
We should mention here that, while you can indeed use an all-in-one device like the Ubiquiti Dream Machine or an ISP-provided router, it is also possible to use a separate device for this role. The advantages might not be immediately apparent, but there are quite a few. The first is that having a dedicated Wireless Access Point (AP) allows you to position it anywhere, regardless of where the router is located. Often, the location of the router ends up being in the basement, which is made of concrete or a similarly dense material that blocks wireless signals. Simply moving your access point to a more central location will already have a considerable impact on the strength of your network. You can also use multiple APs to give better overall coverage if your home layout calls for it.
An important note about WiFi range
Most will say their biggest complaint about WiFi is the supported range being too small. However, before you go out and buy the fanciest wireless access points on the market trying to fix this issue, there are a few things you should know. The first is that WiFi is a bi-directional system, meaning you both send and receive information when you are connected to an AP. Forgetting this fact is a common mistake that I fell for when I set up my old home network, and I ended up paying far too much for a less than ideal experience. This means practically that it doesn't really matter how long of a range your access point has if the client devices aren't powerful enough to transmit back to them.
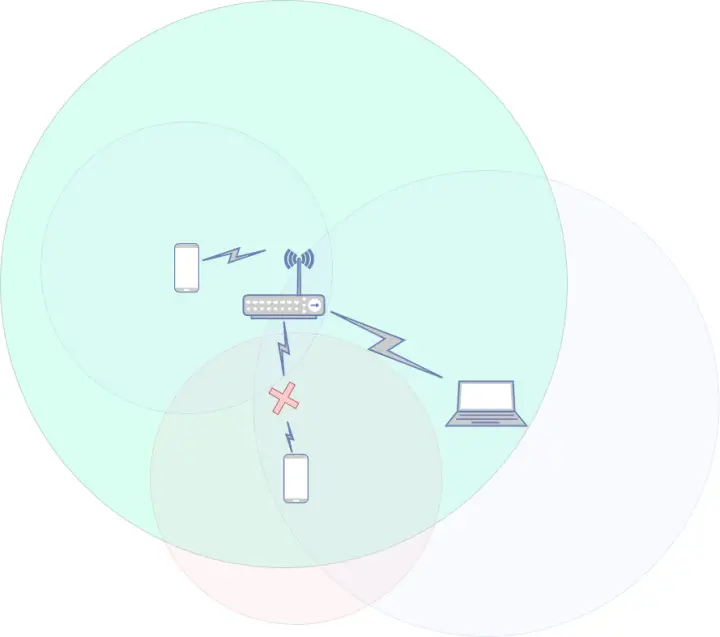
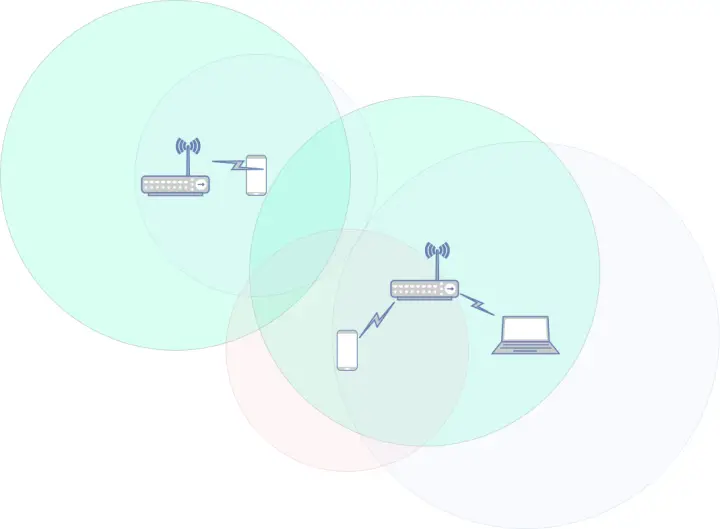
Figure 1 below visually demonstrates how such a situation might present itself. Notice that each device on this diagram has its colored circle representing its transmit range. In this case, the access point has a huge range. The goal is not to be accurate to real-life RF conditions but rather to simply explain how range is not as simple as it first seems. You can see that we have the same phone at two different locations within the access point's range. Note that while both are within the AP's range, only one of the phones has the AP within its range. This means the second phone will not be able to establish a connection to the WiFi network because its own transmit range is too short to reach the access point.
While whoever is attempting to use the out of range phone will be unable to connect to the network, the laptop user that is even further away from the access point will connect just fine. This is because every device has a different antenna configuration, transmit power, and several other factors that result in vastly different ranges. As a general rule, bigger, more powerful electronics (like laptops) will have a bigger range than their smaller counterparts. Additionally, whether the device uses mains or battery power also dramatically influences its transmit power. Most smart devices use relatively small antennas to fit inside small spaces, such as a bulb. The result is that they are often unable to reach long distances, especially compared to long-range APs.
The lesson to learn is that while many access points are marketed as "super long-range" or "ultra-long-range", the client devices often don't have anywhere near the same capacity. Does this mean that these products are useless? No, they can be useful in certain circumstances, but I would recommend against these types of devices for home use. A much better solution is simply splitting up the desired area into multiple zones served by different access points. This gives the benefit of much greater range while also staying within a reasonable distance for most wireless client devices. Note that doing this requires selecting a different channel for each adjacent AP or you risk creating some serious interference that will tank your performance.
See Figure 2 for an example of the same setup with two APs instead of a single long-range model. Notice the overlapping area of coverage between the two access points. This is key as otherwise, you will get dead zones or areas where your connection drops if you are just in between the two areas covered. For this reason, both APs must use different, non-interfering channels. Things will end up much worse if both are interfering as they will constantly be bombarded with information that is meant for one another.
Ubiquiti UniFi UAP-AC-PRO
The Ubiquiti UniFi UAP-AC-PRO-US is a dedicated access point that supports a host of features that make managing your wireless networks a breeze. It comes with support for a guest network, a guest captive portal, remote firmware upgrades, and complete management from the UniFi interface. Using it in combination with any Ubiquiti routers (like the previously mentioned UDM or UDM-PRO) will provide a seamless experience that displays statistics, automatic configuration using the existing settings on your router, and total control from a single app. I highly recommend using this access point if you are looking for a solid WiFi network. Be sure to keep the range in mind, as you might need more than one, depending on the size of your home.
Pros
- Provides excellent signal strength
- Can be moved anywhere for optimal coverage, as you only need a single cable to run it
- Uses Power Over Ethernet (PoE)
- Full integration into the UniFi controller, allowing for easy management
Cons
- A bit pricey, especially compared to all-in-one units
Check out the Ubiquiti Networks UniFi 802.11ac Dual-Radio PRO (UAP-AC-PRO-US) on Amazon here!
Step 3 - Network Switches
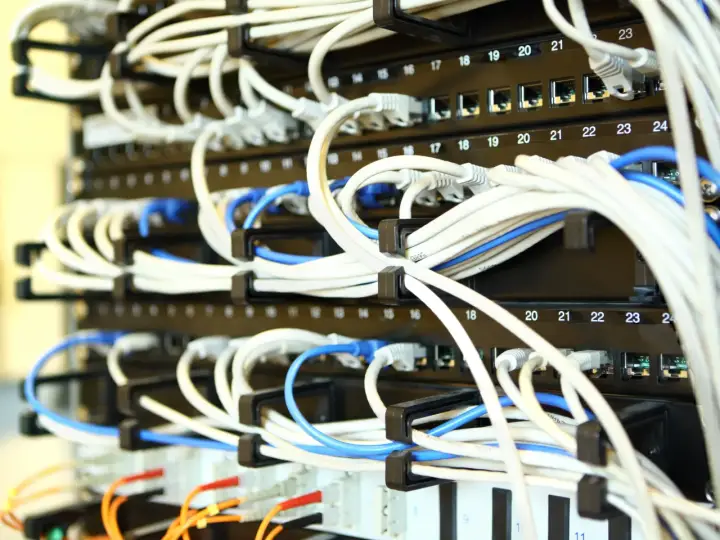
Network switches are like the power bars of networking. They take a single connection and turn it into many, be it one to 8, or one to 10, or even one to 24. They are an essential component of any network, and in fact, even all-in-one routers contain one to provide the ports you see on the back. You might be wondering why they need power and fancy electronics if all they are doing is splitting a single connection into many. Unfortunately, networking is much more electrically complicated than power distribution, and while it is possible to simply connect all the wires together, the performance will be abysmal. The reason is that in such a situation, every network node will receive every network packet regardless of where it's supposed to go.
While you might get away with a so-called "dumb network hub", which just connects all the wires together, you will be stressing every device on your network with everyone else's data. In addition, with modern internet usage, there will be a lot of chatter on those network segments. As such, our friend the Network Switch exists to resolve this issue! It effectively does the same thing as a dumb hub, except it only sends data where it's supposed to be going. The switch starts to direct traffic like you would when sorting mail or with cars at a busy road intersection. Everyone only goes where they are supposed to, now that's efficient!
That means that you should only be using switches to "split" a connection into multiple rather than thinking about other methods. Network switches have come down significantly in cost, with fancy 10Gbit/s units costing as little as 200$. However, you will want to also keep in mind that the switch can bottleneck your performance if it's too slow for the connections you are trying to run through it. As such, it's vital to get a good switch.
Ubiquiti UniFi Switch Lite 8 PoE
The Ubiquiti UniFi Switch Lite is the perfect switch for 1Gbit/s applications. It features 8 RJ-45 ports, of which four support Power over Ethernet (PoE). Those four ports can be used both to provide network connectivity and power devices simultaneously using only one cable. For example, you could plug the Wireless Access Point from earlier into one of these ports, and it would be powered and connected without ever touching a power cable (other than the one for the switch, of course).
Pros
- Eight 1Gbit/s ports, 4 of which support Power over Ethernet (PoE)
- All ports are RJ-45, making it easy to use regular RJ-45 (Ethernet) cables
- Small form factor
- Relatively inexpensive, especially if you don't need the eight ports this model provides (Other models with fewer ports are cheaper)
Cons
- Only supports 1Gbit/s on each port
- No SFP or SFP+ ports means you have to use copper RJ-45 cables
Check out the Ubiquiti UniFi Switch Lite 8 PoE on Amazon here!
Ubiquiti UniFi Switch Aggregation
The Ubiquiti UniFi Switch Aggregation is a serious switch that means serious business. It features 8 SFP+ 10Gbit/s ports and a total switching capacity of 160 Gbit/s that is sure to handle even the most intense loads. It is also in a tiny 1U form factor with a slim depth that, combined with its lightweight, makes it easy to handle and install. Just like the UDM Pro, it comes with a small screen that displays status along with any error messages, which makes it easy to work with. In addition, the screen will sync with your other UniFi equipment to use a similar color, brightness, and other settings you can configure. Finally, since it's meant to go in a rack with the rest of your networking equipment, it also features support for the Ubiquiti Uninterruptable Power Supply (UPS), just like the UDM Pro.
Pros
- Eight blazing-fast 10Gbit/s ports
- 8 SFP+ ports which allow you to select which kind of connection you want to use (ex. copper, fiber, etc.)
- Full integration into UniFi environment
Cons
- A bit pricey
- The need to buy SFP+ transceivers will increase the total cost of setting up this unit
Check out the Ubiquiti UniFi Switch Aggregation on Amazon here!
Step 4 - Wired Connection Media

Wired media may seem like a relatively simple concept, but it can be more complicated in practice. For most uses, virtually any RJ-45 Ethernet cable will work just fine, but for optimal network performance, you will want to put a bit more thought into how your network is wired. Let's start with a common naming mistake. You will often see network cables called "Ethernet cables", and while it's correct in the sense that it is a cable used for the Ethernet protocol, it's not actually called that. These cables are called RJ-45 cables - which is the name of the connector type on the ends. They are usually made up of copper wires that are twisted into four pairs which are used to transfer data.
Copper RJ-45 Ethernet Cables
There are many different types of twisted-pair Ethernet cables, usually denoted by their category. For example, a Cat8 cable can handle up to 40Gbit/s while Cat5e (maybe the most common) can only handle up to 1000Mbit/s (or 1Gbit/s). You can read all about Ethernet over twisted-pair on Wikipedia here. There are a lot of details, but in practice, you only need to note the category number to get a general idea of what kind of cable you need. For example, if you want to have speeds up to 10Gbit/s, you need a Cat6A cable or higher. You must get the right cables as the lower categories will not perform at the desired speeds and will bottleneck your network.
Fiber Optic Ethernet Cables
There actually exists an entirely different type of cable you can use for networking. This is, of course, a fiber network cable. These are far less common in home networks, though they are starting to become more common with the advent of fiber-to-the-home connections, which directly bring fiber connectivity to your modem. There are many different types of fiber cables, and the choices are likely to make your head spin if you haven't understood the key concepts. Here we will briefly introduce the most important ideas and how they will affect your network. Fiber can seem scary, but it is a lot more user friendly than it once was and I believe you can significantly benefit from using them.
The first thing to keep in mind is the connector fiber cables can use. The most common connector type by far is the LC connector, which has a small clip and is square. Virtually all the cables you would want to use for home networking is going to use the LC connector. Usually, you will actually be using a duplex LC connector, which just means that there are two fiber optic lines joined together to form a single connection. The important thing is to make sure your transceivers and your cable use the same connector, as they will not fit.
The following important factor is the fiber's mode, either single-mode or multimode. In reality, this is not usually a significant consideration for home networks, as the primary difference between the two is the distance they can travel before the signal starts to degrade beyond an acceptable point. To make a long story short, multimode fiber can send more data at once as it uses several beams of light to transmit in parallel, whereas single-mode fiber uses a single light source. However, multiple beams stop being effective over very long distances as they degrade and become practically uninterpretable at the other end. As such, single-mode is usually used for stretches in the kilometers, while for shorter runs, multimode is the better choice.
Considering these facts, we will only be talking about multimode fiber here. Within the world of multimode fiber, there are several different types of cables, namely OM1, OM2, OM3, OM4, and OM5. These refer to technical details about how the glass core is built, its thickness, and so on. The actual details are not important for home use, so we will not dive into them too much. The important detail is that the types with higher numbers usually support longer distances, but for us, the lowest laser-optimized type, OM3, will do just fine. OM3 supports a 10Gbit/s connection for a distance of up to 300m/1000ft or a 100Gbit/s connection for a distance of 100m/330ft. As you can see, these distances should be more than enough, though you should feel free to use a different type if you need to make a longer run.
Alright, that was a lot of information. In practice, you can almost certainly get away with using an OM3 LC to LC cable. They have an aqua jacket color and are quite common in most stores. This LC to LC OM3 cable on Amazon is a good choice and is what I use for my network. Also, keep in mind that you will need an SFP+ transceiver to use it.
SFP And SFP+ Transceivers
You have probably noticed by now that some of the ports on network switches are not the usual RJ-45 but rather a weird hollow rectangle shape. That's because they are meant for SFP transceivers, which are really cool and allow you to put different kinds of connections into the same slot. That means you could use the same switch to handle both fiber and RJ-45 connections, all customizable by you! While it might seem a little bit overwhelming at first, you will quickly see that there is nothing too complicated about these transceivers. The most important thing to do is to read the specs carefully so you don't end up with something that works at half the speed you expected it to.
The main difference between SFP and SFP+ is that the former is an older technology that supports speeds up to 4.25Gbit/s while SFP+ can go up to 16Gbit/s. We should also note that there are other, even faster versions of the standard, such as SFP28, which goes to 25Gbit/s, and QSFP28 which goes up to 100Gbit/s. For the sake of simplicity, we won't be going into those here, but it's good to keep in mind that they do exist should you need to support speeds beyond 10Gbit/s.
RJ-45 SFP+ Transceiver
These are perhaps the easiest to use and understand for most users, as they effectively bring the classic RJ-45 connector that every consumer router or switch has back to the professional space. These are nice for easily integrating a high-speed switch, like the Ubiquiti UniFi Switch Aggregation, into your existing network wiring without the need for an expensive overhaul or rewiring. They simply push into an SFP/SFP+ slot and immediately begin working. The outer metal flap on the front is used to lock it into the slot, and pulling on it will release the transceiver for removal. The biggest downside with this particular type of transceiver is their relatively high cost, especially compared to fiber which is easily at least half the price.
Check out the 10Gtek 10GBase-T SFP+ RJ-45 Transceiver on Amazon here!
Fiber Optic SFP+ Transceiver
The main difference with fiber SFP+ transceivers is the front of the unit, where you will find two small square slots rather than the familiar RJ-45 connector. These are where the fiber patch cable connects, using the LC connector type. Note that while there are a lot of different kinds of fiber cables, these are made for OM3 multimode fiber with LC connectors on either end. The most important thing to remember with these is that they are extremely sensitive to dirt inside the optical pathway, meaning that you should be cautious not to touch the inside of either the fiber cable or the connectors inside the transceiver. It's not usually too big of a problem, but you still want to limit their exposure to the elements by putting the caps back on if you ever unplug them for more than a second. The biggest benefit with fiber SFP+ transceivers, other than their absurd speed, is their low cost - especially compared to the RJ-45 solution.
Check out the 10Gtek 10GBase-SR SFP+ Fiber Transceiver on Amazon here!
Pre-fabricated patch cables
While we are talking about wired connection media, we should mention that there are cables known as "SFP direct attach cables", which are basically two transceivers joined by a (usually short) cable. These are super useful for connecting things within close proximity of your networking equipment. That's because they just plug into an SFP port on either side and immediately form a connection between those two points. No need to buy separate transceivers and a cable. In fact, these are usually much cheaper than buying everything separately.
10G SFP+ Twinax Direct Attach Cable
This direct attach cable is perfect for connecting a switch to a router, a NAS to your switch, or any other essential connection that runs over a small distance. The most significant advantage is the absurdly low cost, especially if you consider the price of a cable and two transceivers. For copper, that could easily cost upwards of 100$, while these are usually under 30$. The low cost does come with a downside, though, it is much more fragile than many other kinds of cable, and as such, you should be careful not to bend it too much and not to touch the pins at the end of the transceiver modules.
Check out the 10G SFP+ Twinax Direct Attach Cable on Amazon here!
Step 5 - Network Cards
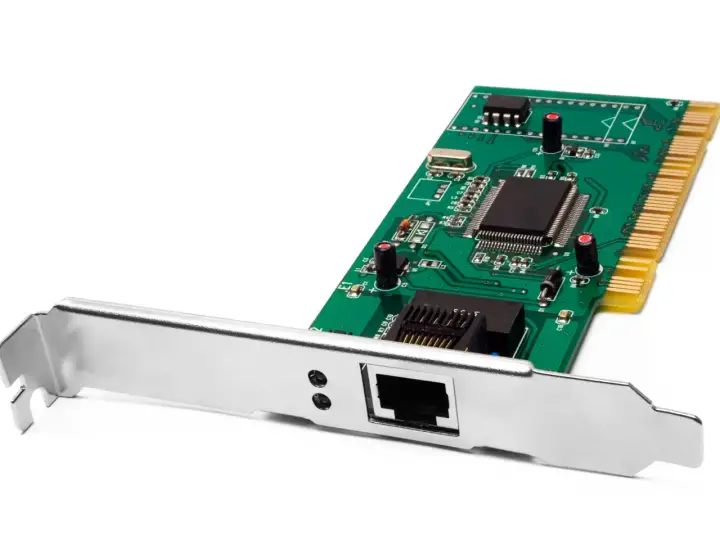
Network cards are, in a way, both not relevant and extremely relevant at the same time. Most people will get by without even thinking about them, as virtually every device you would want to network comes with some form of onboard networking. For most PCs, that comes in the form of a 1Gbit/s (sometimes 2.5Gbit/s on fancy gaming computers) RJ-45 connection. You might be thinking, if the computer only has a 1Gbit/s port, how are you ever going to get a faster link than that? The answer is network cards, which come in sorts of shapes and sizes depending on how they are meant to be used.
I recently installed a network card in my PC so I could run a fiber connection directly into it, rather than doing some sort of conversion to RJ-45. The whole reason this came about was that the copper RJ-45 cable I had could seemingly only handle 5Gbit/s, despite all the equipment along the way supporting 10Gbit/s. I was obviously quite unhappy with this result, seeing as the higher end equipment wasn't cheap. However, running a fiber cable ended up being more affordable than the original copper solution since the cable itself and the transceivers were both less expensive.
Intel 82599EN Chipset Network Card
This is an example of a network card you could use to get a high-speed connection on your PC. The important thing is that it's compatible with the Intel 82599EN chipset, which is key for optimal compatibility. In my own experience, I had a lot of problems with cards that had other kinds of controller chips, as they would work but did not perform anywhere where near the speed I expected. Apparently, software compatibility is a common issue with network cards. As such, you are probably best served by one that is known to work with many different kinds of hardware. It also works great with NAS operating systems like TrueNAS.
Notice this card has an SFP+ port on the back, meaning you can insert whatever kind of transceiver you like to plug, either an RJ-45 cable or even a fiber optic cable! This does slightly drive up the cost, but for the flexibility and speed potential, I think it's definitely worth the investment.
Check out the 1 Port 10GbE SFP+ Network Card on Amazon here!
Putting it all together
So that was a lot of information. The reality is you don't need to know every detail we discussed off the top of your head, but you will benefit greatly from keeping them in mind while doing your initial planning. Feel free to bookmark this page to come back to it as you build up an idea of what your ideal smart home network will look like or for when you are looking to perform upgrades. You have a lot of choices to make, but they don't have to be difficult. Most of them will come down to what you need from your network, not just today but also in the future up to 5 or more years down the line. Installing equipment that may seem "overkill" today will save you the hassle of needing to upgrade everything in the future.
Recommended compromises
We can talk about the best of the best all day, but in the real world, we can't always justify spending thousands of dollars on infrastructure, especially if the benefits are not immediately obvious. That is why in this section, we are going to briefly discuss what kind of compromises are best in terms of driving the cost down today without causing a massive headache in the future. But, first, let's see what you definitely should not compromise on.
Any of the following are not good ideas to compromise with:
- The router, since it's the core of the network and can often bottleneck everything regardless of how good the rest of the network is
- Cables, especially if you plan to install them in the wall or in any way more than simply running them along a wall
- The cable between your router and modem. Never, ever, ever compromise here. This is perhaps the most crucial link in your whole network, other than the one between the router and WiFi access point.
The following are items that can be easily upgraded in the future without any substantial il effects:
- SFP/SFP+ transceivers. These can easily be swapped out and are not that expensive, so it's easy to simply get new ones when you need better performance. In addition, they are usually highly compatible, meaning you can use a slower transceiver with a faster cable, and it will work fine. You can then upgrade the transceiver when you deem it necessary without touching any cables.
- Network cards. Think of wired connections into your NAS, PC, or any other computer you might have. They will usually come with a 1Gbit/s connection out of the box, but you can upgrade them to use a better one down the line should you want a faster connection. Sadly, most will be RJ-45, meaning if you're going to use fiber you will either have to install a card from the get-go or change cables when the time comes.


