How to Remember your Plant's Water with an ESP8266
Updated on 15th Sep 2020 14:21 in DIY, IoT, Smart
One of the things I have never been truly good at is remembering to do specific tasks that should ideally be done on a frequent basis. I recently received a plant as a gift and although it says it requires little attention I know that despite my best effort I will forget to water it regularly which will result in a sad plant. Luckily there is technology all around that can help me with this task.
I know that there are several options available on the market, anything from cheap little sticks that change the colour of an LED light based on the moisture level to fully integrated systems that can be used to manage a garden. None of these options cleanly fit my goals of having a simple, cheap, and easily customizable device that could be used to keep track of the soil's humidity and report this value within my HomeAssistant system (HomeAssistant is DIY friendly smart home software that is super customizable, see home-assistant.io).
Table of Contents
Bill of Materials
- Capacitive Moisture Sensor (Amazon)
- ESP8266 board, I used the Nodemcu 1.0 (Amazon)
- Perf board, like this (Amazon)
- Wires
Most of these can be switched out with any given similar product; these are just the ones I used. If you had success using something different, let me know in the comments!
The Design
The design of this project wasn't too difficult to do. The hardware is just a humidity sensor connected to an ESP8266 via the analog port. As such, the circuit is straightforward:
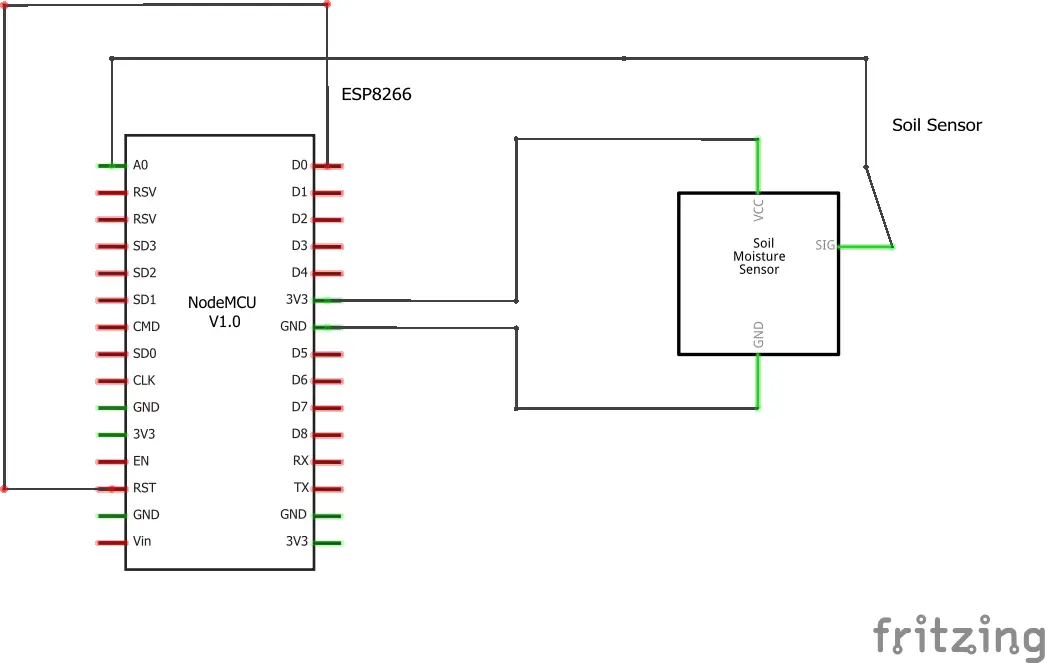
As far as powering the system goes, there are a few different options. I plan to use a battery pack with four AA batteries connected to the VIN pin of the board, but since there are so many different possible configurations, I've omitted it from the diagram. Further, the connection between D0 and the RST pin allows the board to reset its self after entering deep sleep. This is very useful in saving battery power, and since the collected data is not very time-sensitive, we can afford to sleep for long periods, saving a lot of energy in the process. It should be noted, however, that the benefit of doing this if the board will be connected to mains power is not nearly as high and it might be better to leave that connection out. Important: do not connect RST to D0 until after you have uploaded the code to it. It will not be able to be programmed properly if you make this connection first.
The Software
The code for this project was a bit more complicated, but thanks to a few libraries, most of the complicated code is already taken care of. The idea is that the board will wake up after sleeping for a set amount of time, connect to a wifi network, connect to an MQTT server, read the analog sensor value and publish it to it's MQTT server.
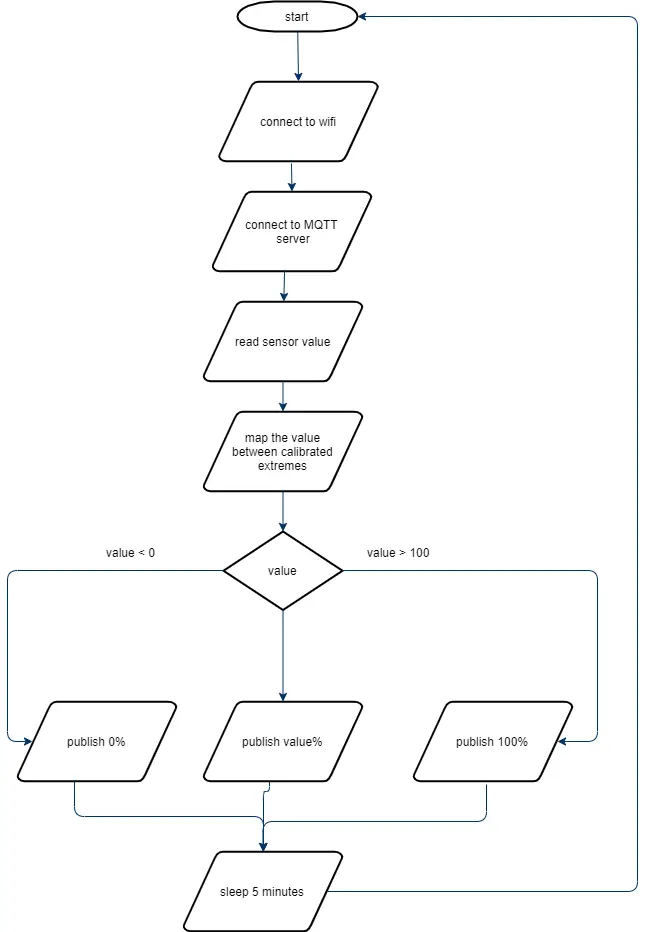
The software will then publish the obtained moisture values via the MQTT topic "/plant/moisture", which is what I used - don't forget to change this if you have more than one of these or else they will conflict. Since we use calibrated values for the sensor, it is necessary to specify the max and min as it is possible to receive an amount that is either higher or lower than the initial calibrations.
The Build
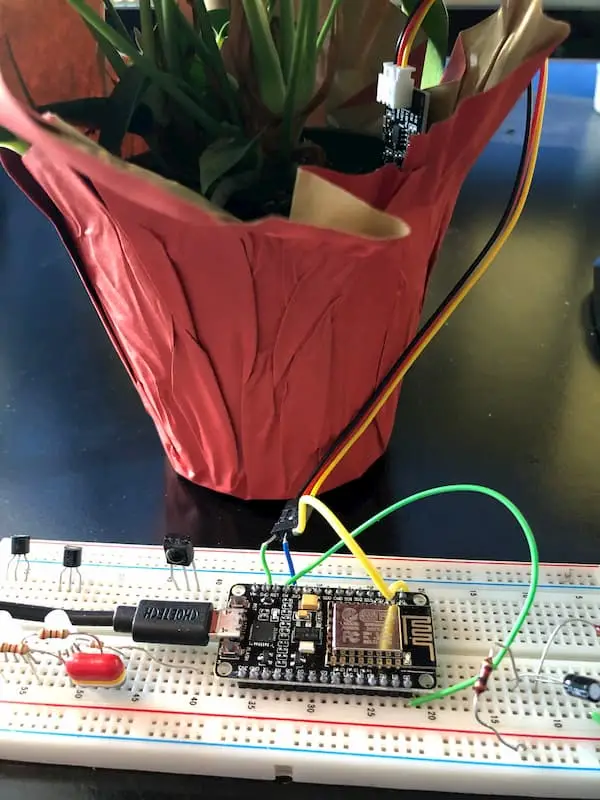
I first started by wiring up a very temporary breadboard installation to test the code and hardware. The picture gives some perspective on what the completed circuit looks like, although it was done very quickly and there are many components on the breadboard that are not related to this project.
Now that everything works on a breadboard, it's time to make things a bit cleaner and a bit more permanent. The transition to a perf board was reasonably straight forward. The main issue with perf board is that all connections must be made with jumper wires, so it is undoubtedly less ideal than using a printed PCB, but it is also a lot cheaper and quicker. I had a three-pin header lying around so I used it to allow the soil sensor wire to be removed if I ever needed to do that, though I could have just as easily cut the connector off the sensor and soldered the wires directly to the board.
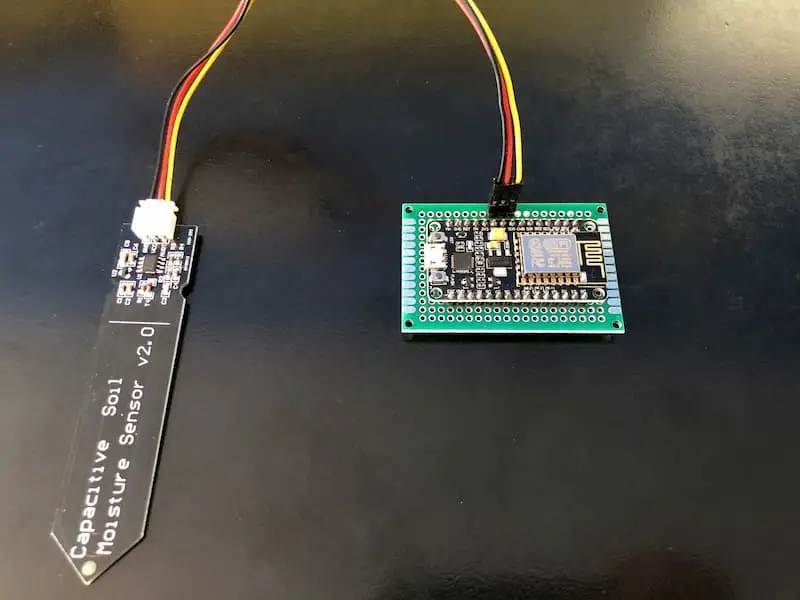
going everywhere seems much cleaner than the breadboard
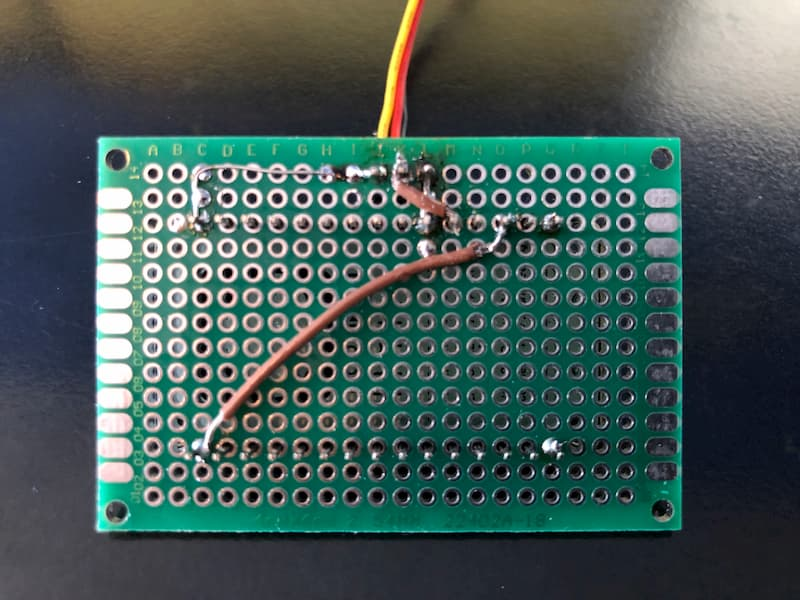
job done and shouldn't have any shorts.
I had some difficulty soldering the header on correctly since the required connections were unfortunately precisely reversed on the ESP. In any case, I managed to get it attached, and it now looks reasonable from the top side, just avoid looking under! The critical thing to remember is that the board will not flash a new sketch once you connect the wire between D0 and RST. Don't be like me and solder it only to realize after that you still need to upload an updated version of the code. If you end up in that situation it's just a matter of disconnecting the wire while you upload the sketch to the board, it may be a good idea to add a switch to that wire if you think you will be updating the board frequently. Alternatively, you can avoid all this hassle if you don't need to make use of the deep sleep function, but I would only recommend that if you are going to power the board using mains electricity, as batteries are sure to die fast otherwise.
The code
The code below will get the value of the soil moisture sensor and publish it to the MQTT server specified within. It publishes the values to the MQTT topic "/plant/moisture", to change the topic if you plan to use more than one of these or they will overwrite each others value.
#include <SPI.h>
#include <ESP8266WiFi.h>
#include <MQTT.h>

const char* ssid = "yourSSID";
const char* password = "yourpassword";

WiFiClientSecure net;
MQTTClient client;

const int AirValue = 715;   //you need to replace this value with Value_1
const int WaterValue = 320;  //you need to replace this value with Value_2
const int SensorPin = A0;
int soilMoistureValue = 0;
int soilmoisturepercent=0;
unsigned long lastMillis = 0;

IPAddress ip(192, 168, 3, 4);
IPAddress gateway(192, 168, 1, 1);
IPAddress subnet(255, 255, 0, 0);

void setup() {
  Serial.begin(115200); // open serial port, set the baud rate to 9600 bps

  Serial.print("Connecting to ");
  Serial.println(ssid);

  WiFi.config(ip, gateway, subnet);

  WiFi.begin(ssid, password);

  net.setInsecure();

  // Note: Local domain names (e.g. "Computer.local" on OSX) are not supported by Arduino.
  // You need to set the IP address directly.
  client.begin("192.168.1.66",8883, net);

  connect();
}

void connect() {
  Serial.print("checking wifi...");
  while (WiFi.status() != WL_CONNECTED) {
    Serial.print(".");
    delay(1000);
  }

  Serial.print("\nconnecting...");
  while (!client.connect("soilsensor", "try", "try")) {
    Serial.print(".");
    delay(1000);
  }

  Serial.println("\nconnected!");
}

void loop() {
  client.loop();

  if (!client.connected()) {
    connect();
  }

  soilMoistureValue = analogRead(SensorPin);  //put Sensor insert into soil
  Serial.println(soilMoistureValue);
  soilmoisturepercent = map(soilMoistureValue, AirValue, WaterValue, 0, 100);
  if(soilmoisturepercent > 100){
    Serial.println("100 %");

    String value = String(100);
    client.publish("/plant/moisture", value);
    delay(250);
  } else if(soilmoisturepercent <0) {
    Serial.println("0 %");
    String value = String(0);
    client.publish("/plant/moisture", 0);
    delay(250);
  } else if(soilmoisturepercent >=0 && soilmoisturepercent <= 100) {
    Serial.print(soilmoisturepercent);
    Serial.println("%");
    String value = String(soilmoisturepercent);
    client.publish("/plant/moisture", value);
    delay(250);
  }

  ESP.deepSleep(300e6);
}
Calibrating the Sensor
If you upload this code directly to the board, you may notice that the % values that it gets are off. This is because each sensor can have some variation in its values, and the solution is to calibrate it. In order to calibrate the sensor simply upload the code without the "ESP.deepSleep(300e6); " line and instead replace it with some "delay(2000);". Also, ensure the D0 to RST wire isn't connected, as it will prevent the ESP from working while you're doing this.
Once this is done, connect the serial monitor and watch the values as they appear. The first value you want to get is the value the sensor reads in dry air, in my case, this value was roughly 715, and so that's the value I used. The next value to find is the sensor value while it is directly in a cup of water, for me, it was 320, and so WaterValue was set to 320. Once those two values are found, the system is now calibrated, and it should report the humidity % correctly, if not keep recording different values.
The Setup
Now that the device is built, the only thing remaining is to set it up with my Homeassistant instance. This will vary a lot depending on the exact server setup, but in my case, I added the following to my configuration.yaml.
- platform: mqtt
  name: "Plant Moisture"
  state_topic: "/plant/moisture"
  unit_of_measurement: '%'
  value_template: "{{ value }}"
  unique_id: "anthurium_moisture"
This results in Homeassistant showing a badge with the % humidity on the main panel.

