How to Automatically Sync iOS Alarms With Home Assistant
Updated on 15th Sep 2020 14:02 in Home Assistant, Tutorial
For a very long time now, I have wanted to be able to sync my "bedtime" alarm within the iOS clock app with my Home Assistant automations. It would be so nice to only need to specify my alarm in one place instead of multiple or having to abandon the app I've used for so long. I always thought this was impossible, but I have recently discovered that the Shortcuts app on iOS can be used to do this exact task, and so much more!

Table of Contents
The setup
First, let's go over the setup that will be used to make this work. On the iOS device, we will use the Shortcuts app to create an automation that will find our alarm and transmit it's set time to Home Assistant (HA). Then HA will use this value to perform an action at (or slightly before) that time every day, depending on certain other user-defined conditions.
As such, for this to work, you need:
- An iOS device, such as an iPhone, iPod, or iPad. This really works best if you use the device as an alarm already.
- A Home Assistant instance. Note that we are explicitly talking about Home Assistant here, but really any service can be used as long as it has an API and can be activated via an HTTP request.
- Appdaemon if you want to implement the Gentle Wakeup example
The Appdaemon code is only required if you want to slowly dim a light that does not support the "transition" option. Otherwise, everything can be done in the Home Assistant UI.
The Shortcut
There are two options for the Shortcut: either download my premade Shortcut from here or try to follow the explanation to create the same thing. I recommend just downloading the premade version as it will be a lot easier, but either will work. Skip over the download section if you are going to create the Shortcut yourself.
The download
If you choose to download, you must perform the following steps for it to work. First, go to Settings, then scroll down and select "Shortcuts".
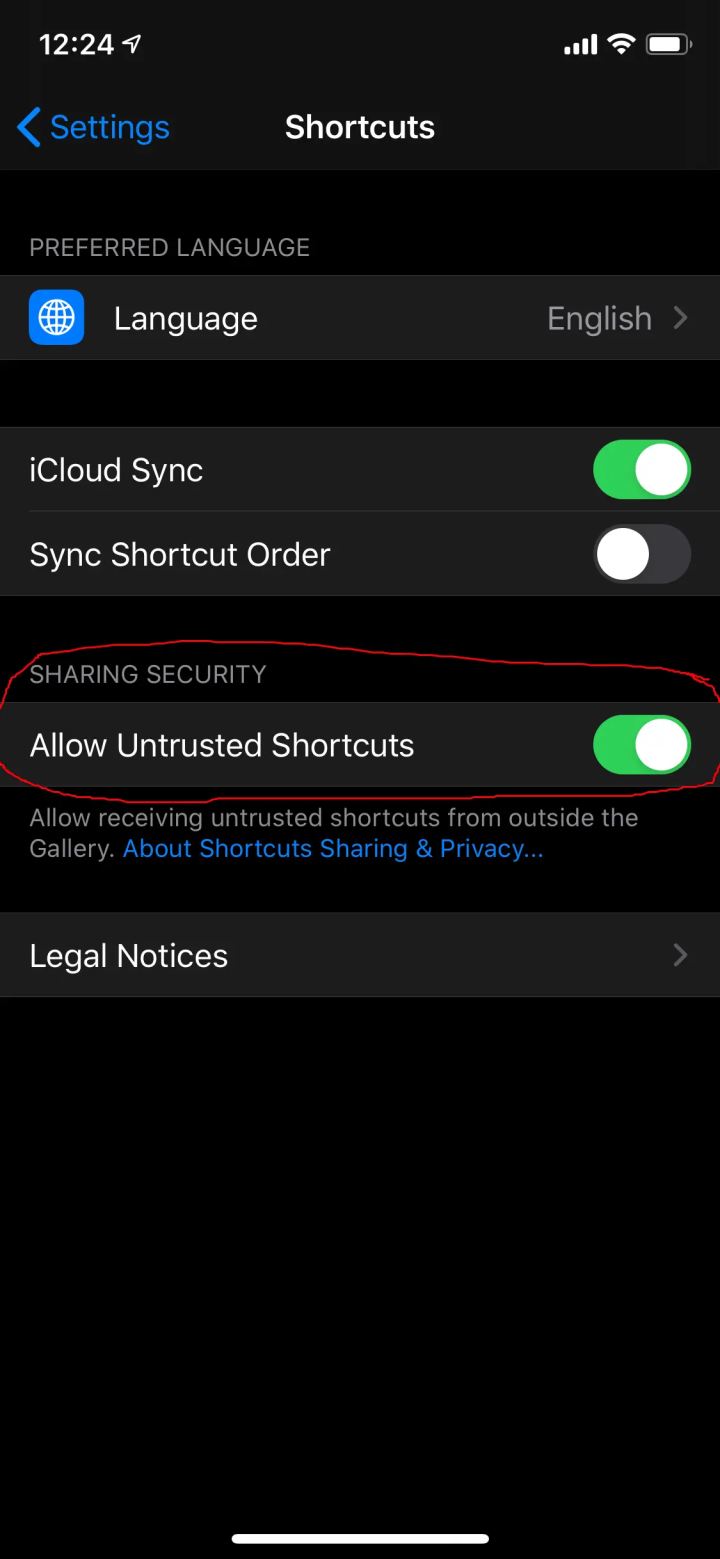
Then make sure that "Allow untrusted shortcuts" is enabled. Without this, you will not be able to run shortcuts that have been downloaded from the internet. Don't worry, you will still be asked for confirmation before installing any new shortcuts.
Next, navigate to the download link on your iOS device, click "Get shortcut", then scroll to the bottom of the Shortcut and click "Add untrusted Shortcut". You will now be asked a few questions that will walk you through configuring each variable required by the script. You will need both the URL of your Home Assistant instance and a long-lived access token.
Configuring and creating a token
The only required parameters are the URL and a long-lived access token. If you download the Shortcut, you will be asked for each one of these as you import it, otherwise, you will need to input them yourself into the appropriate text field. We will go over each textbox in the next section. In either case, we will need to generate a token. To do this, head over to the Home Assistant UI.
Then click on your name on the bottom left and scroll all the way down to "Long-Lived Access Tokens".
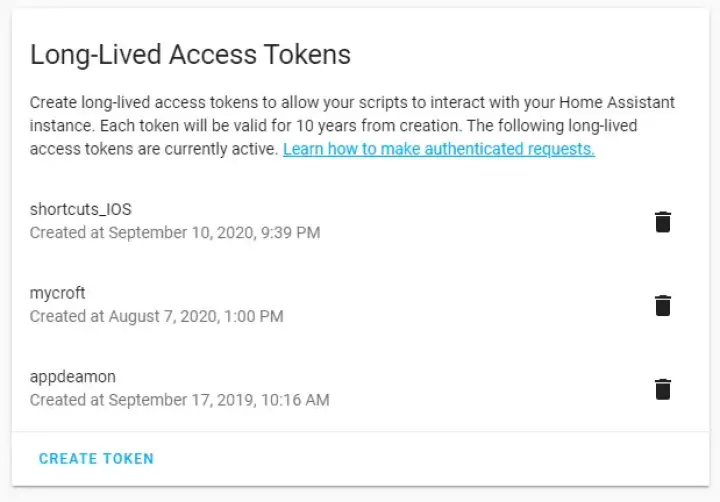
Click on "Create token". When prompted for a name, put something descriptive like "shortcuts_ios". Next, you will be given the token, you must copy it as it won't be displayed again. If you are using a computer, email the token to your phone and if using a phone simply paste the token into the "token" text field in the Shortcut.
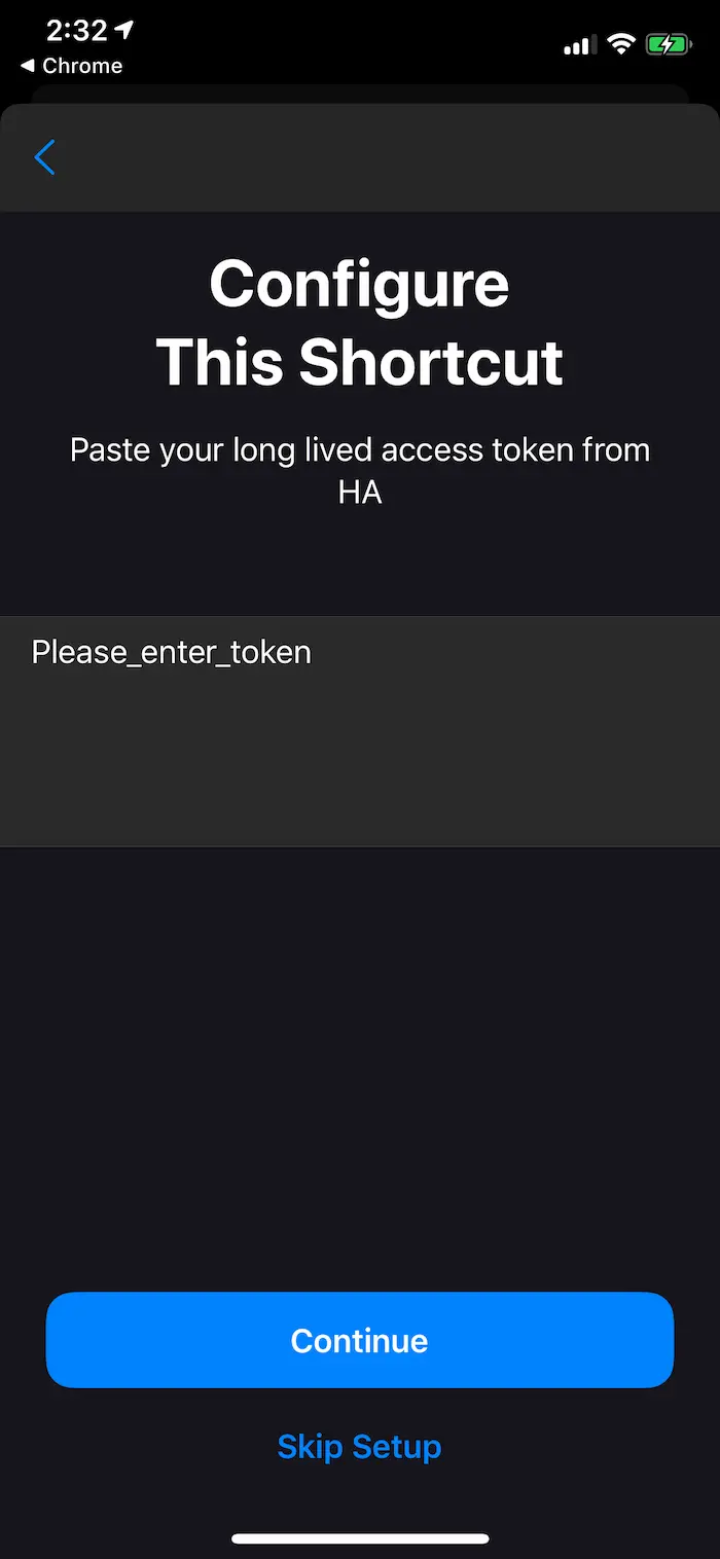
Paste the token here!
The second thing is to configure the URL, just make sure that the value is correct for your Home Assistant instance. In newer installs this tends to be "http://homeassistant.local:8123", but be sure to put whatever you use to access the UI. Remember that the sync will only work in places you can access the UI.
The explanation
The Shortcut is relatively small but very powerful. We will quickly see how only a few elements can do something rather complicated, allowing for some really great automations to be created. The Shortcut will be viewed in two halves, the first half being "Setup" and the second being "execution".
Setup
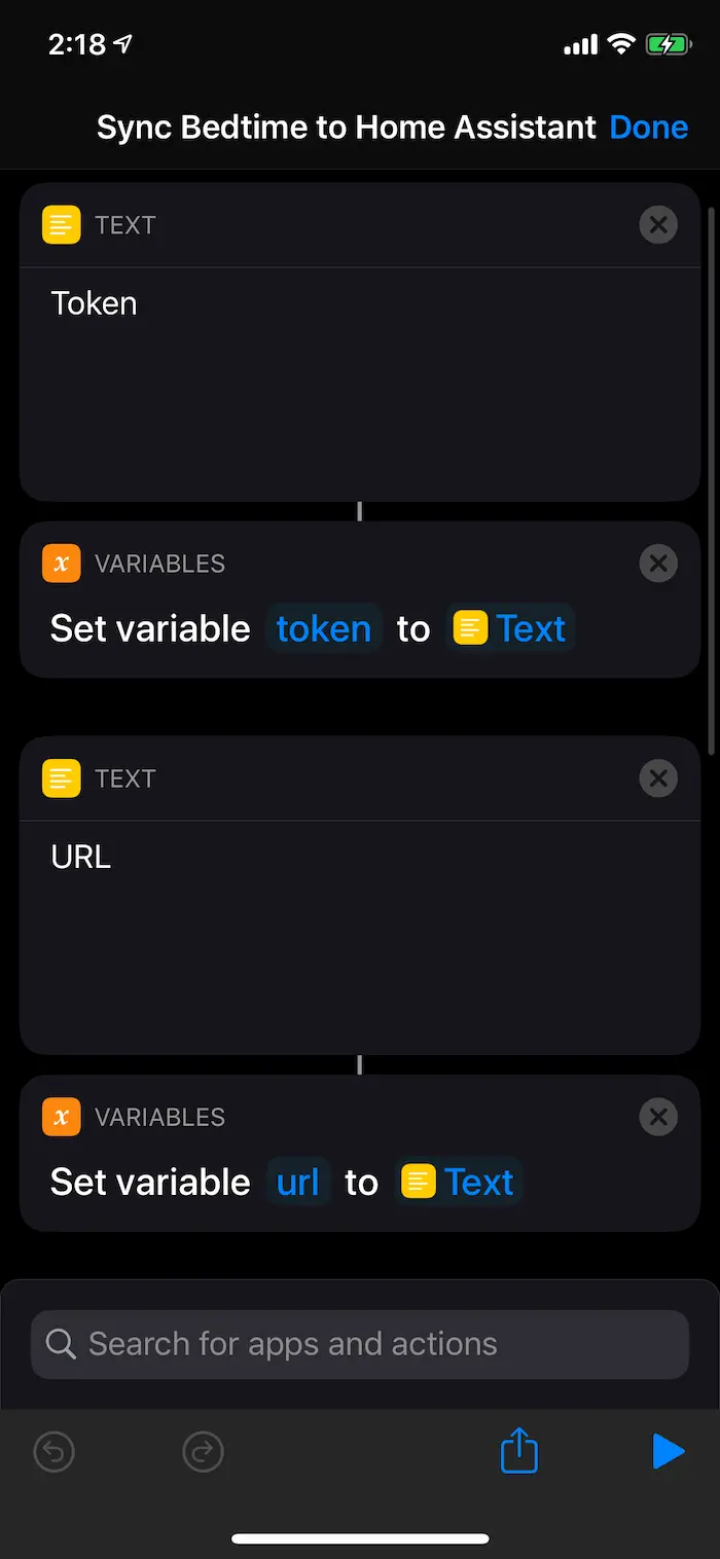
The first half exists to configure the basic parameters of the Shortcut. The very first element is a textbox that should contain the entire value of the long-lived access token generated earlier. Be sure that it doesn't have any extra spaces or characters, as these will change the value and result in an error.
Next, there is a variable assignment which places the value of the textbox (the token) into a variable named "token" for later use. Following this, there is another textbox that will hold the value of the full URL of the Home Assistant instance - including the port if needed. That textbox will be placed into a variable called "url" by the next element.
That's it for the first half! Easy right?
Execution
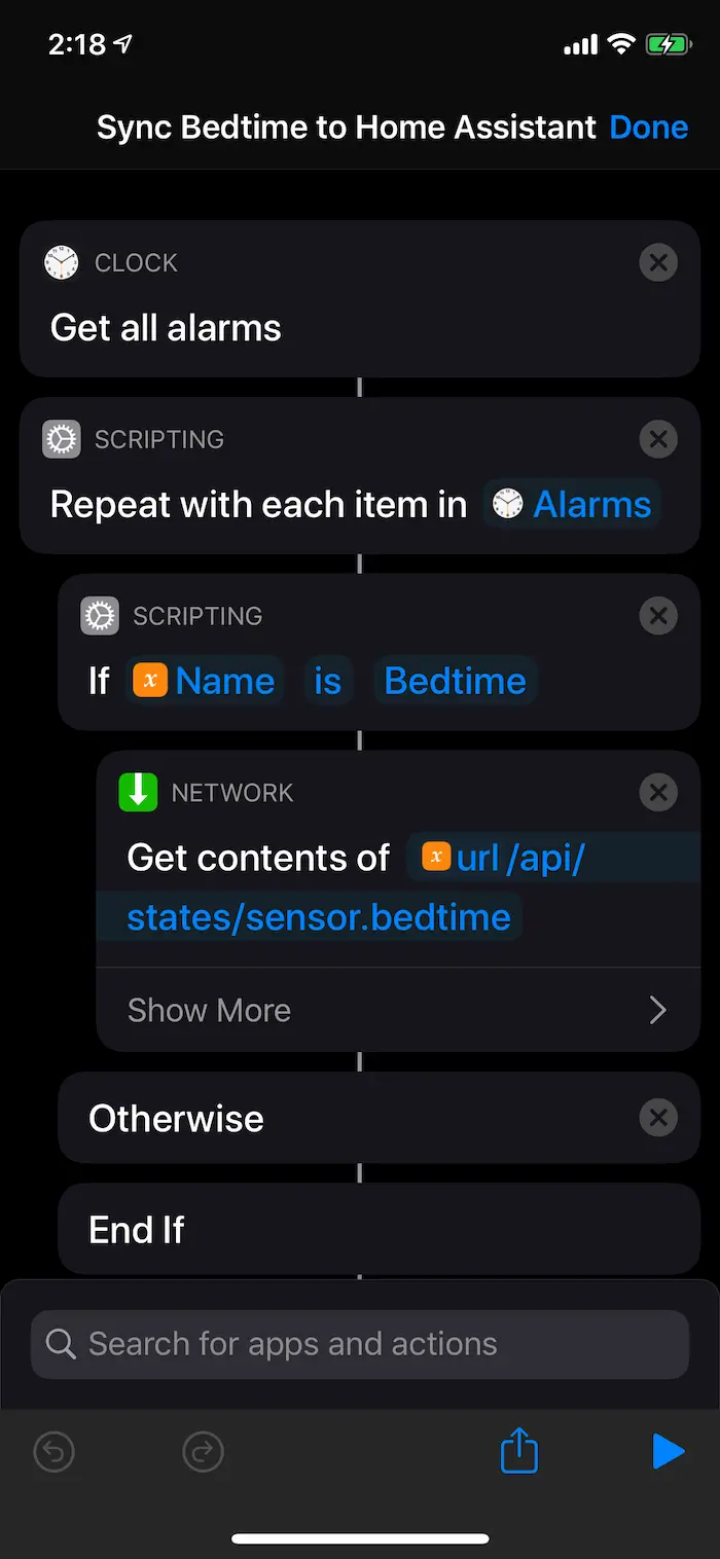
The second half does a lot with only a few elements, so let's get straight into it. First, a Clock action is used to "Get all alarms", which will, as the name might imply, return a list of all the alarms on the device. Next, a scripting element called "Repeat" is used to loop over each returned alarm individually, also known as a "for each" loop.
Now the next blocks are indented slightly. This is to indicate that all of the indented blocks are running as a part of the parent condition. That means that "If Name is Bedtime" is being executed on each alarm that was in the list obtained previously because it is indented under the repeat.
The "If" block is a condition that is checking if the "Name" parameter of any given alarm is "Bedtime". This means that any blocks indented below the "If" will only run if the alarm's name is "Bedtime" (case sensitive).
In the picture, the "Network" block is visible. The action is to "Get contents of url/api/states/sensor.bedtime", but the name is misleading as we aren't "GET"ing the content, we are "POST"ing it. Notice the use of the "url" variable from earlier, this will concatenate the URL you specified earlier with the path to the Home Assistant REST API, which will be covered in a bit.
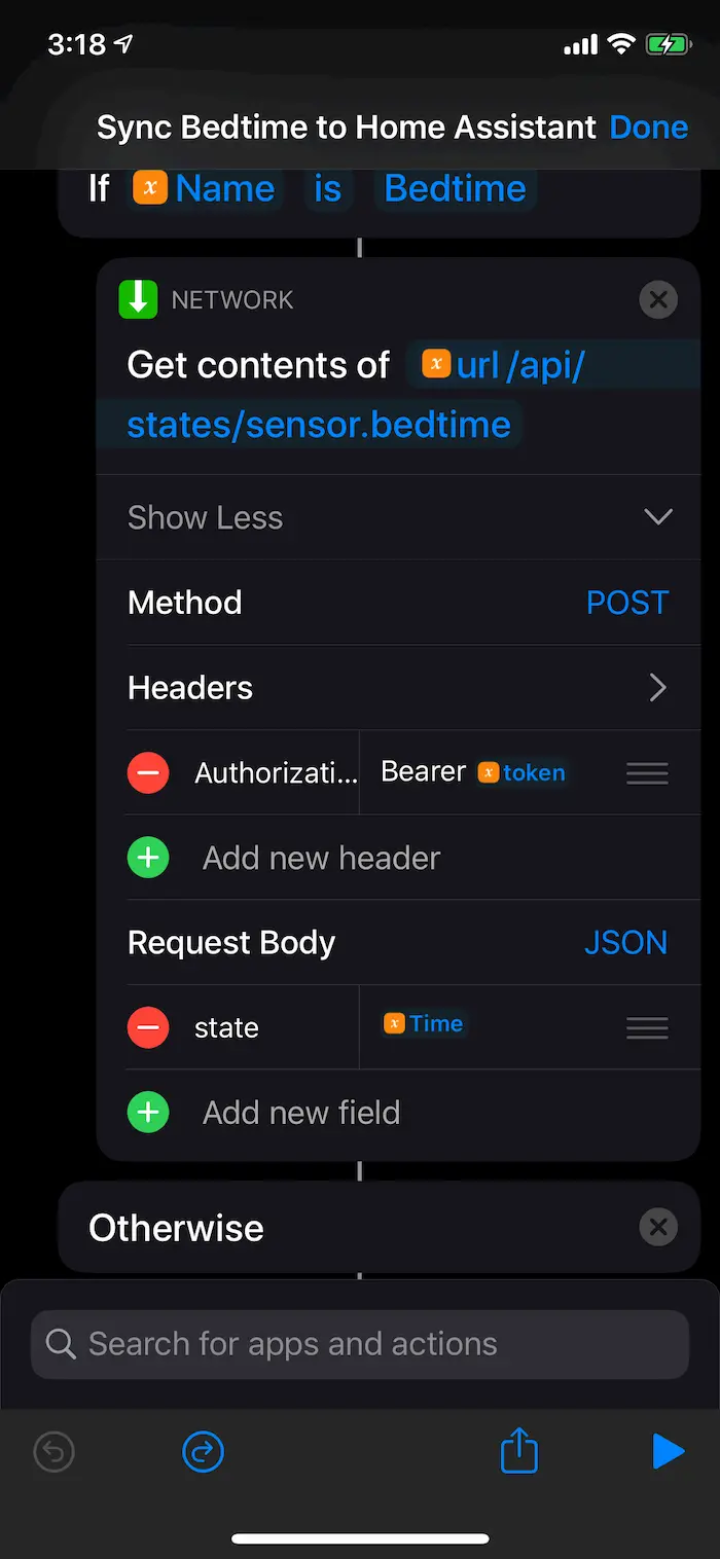
Within the network block, we have three primary parameters:
- Method, which will be "POST" because we are sending information to the specified URL
- Headers, which will contain a field named "Authorization". The value will be the string "Bearer " with a single space to separate the Bearer and the token specified at the beginning.
- Request Body, which is set to JSON. This is just the format of the data we are sending and that Home Assistant expects to receive.
Finally, there is one field in the request body named "state". The state field will have the value of the "Time" parameter, which is a variable contained in the alarm from earlier. This value comes from the same place as "Name" in the above If statement.
Note: The "Authorization" header is what gives us permission to modify things. If there is anything wrong with the token this header will be wrong and there will be errors when running the Shortcut. In case of errors, this is an excellent place to start looking for problems.
That's it! This Shortcut will now loop over all your configured alarms, find one named "Bedtime" (as configured by the bedtime function) and send the time of that alarm to the Home Assistant API. The API will then create or update an entity named "sensor.bedtime" with the given value.
Configuring the Shortcut to run automatically
At this point, you should have a Shortcut setup under "My Shortcuts" in the Shortcuts app. Clicking on the new Shortcut should run it, and there shouldn't be any errors assuming that the bedtime function is enabled and that the URL and token are correct. We don't want to have to run this by hand every day though, so how do we get this to run automatically?
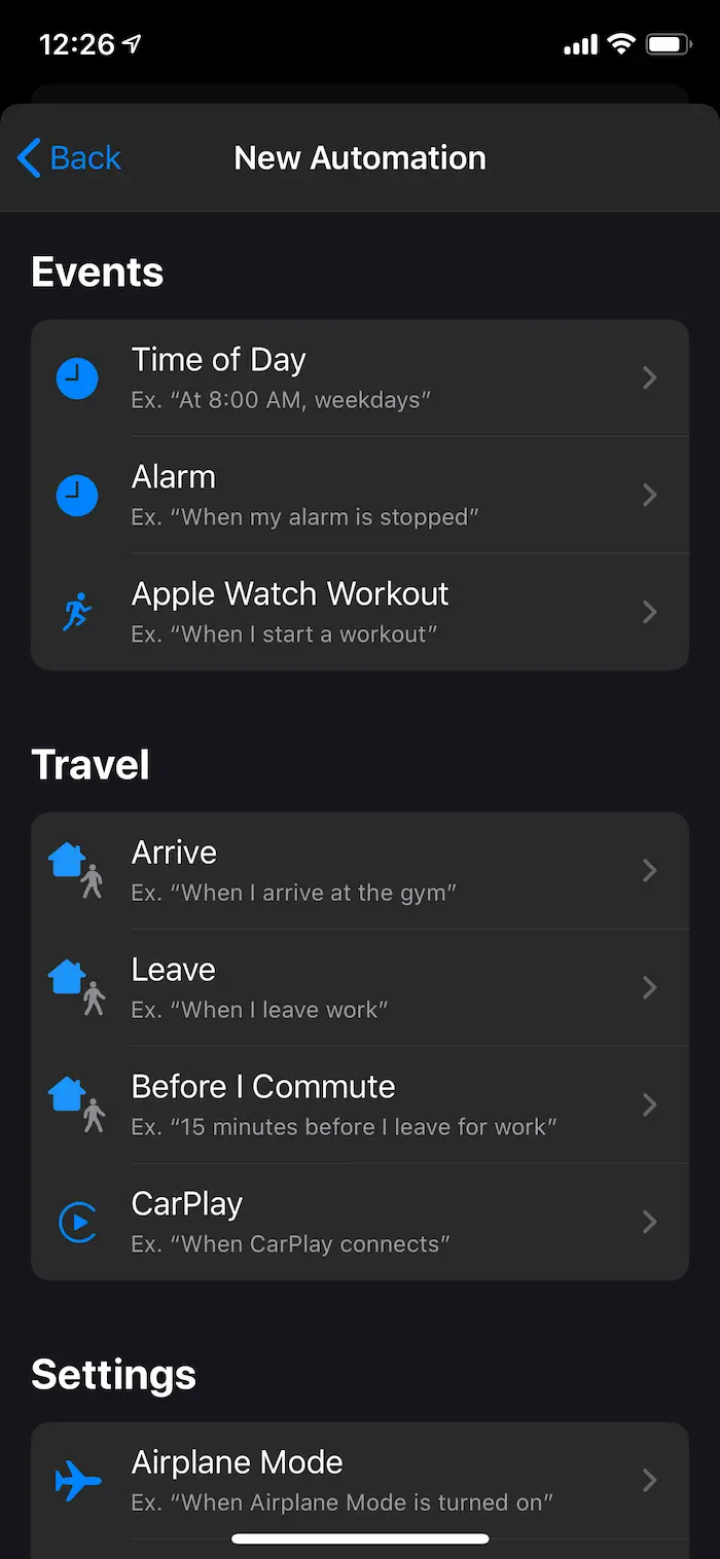
In the Shortcuts app, click on "Automations". Then add a new automation either with the "Create Personal Automation" button or by clicking the plus symbol in the top left. Click "Create Personal Automation" if prompted. On the new automation screen, click on the "Time of Day" event to create an automation that runs at the specified time.
Then set the time of day to something in the middle of the night, long after you would have set your bedtime and before the alarm is scheduled to go off. Mine is set to 3am.
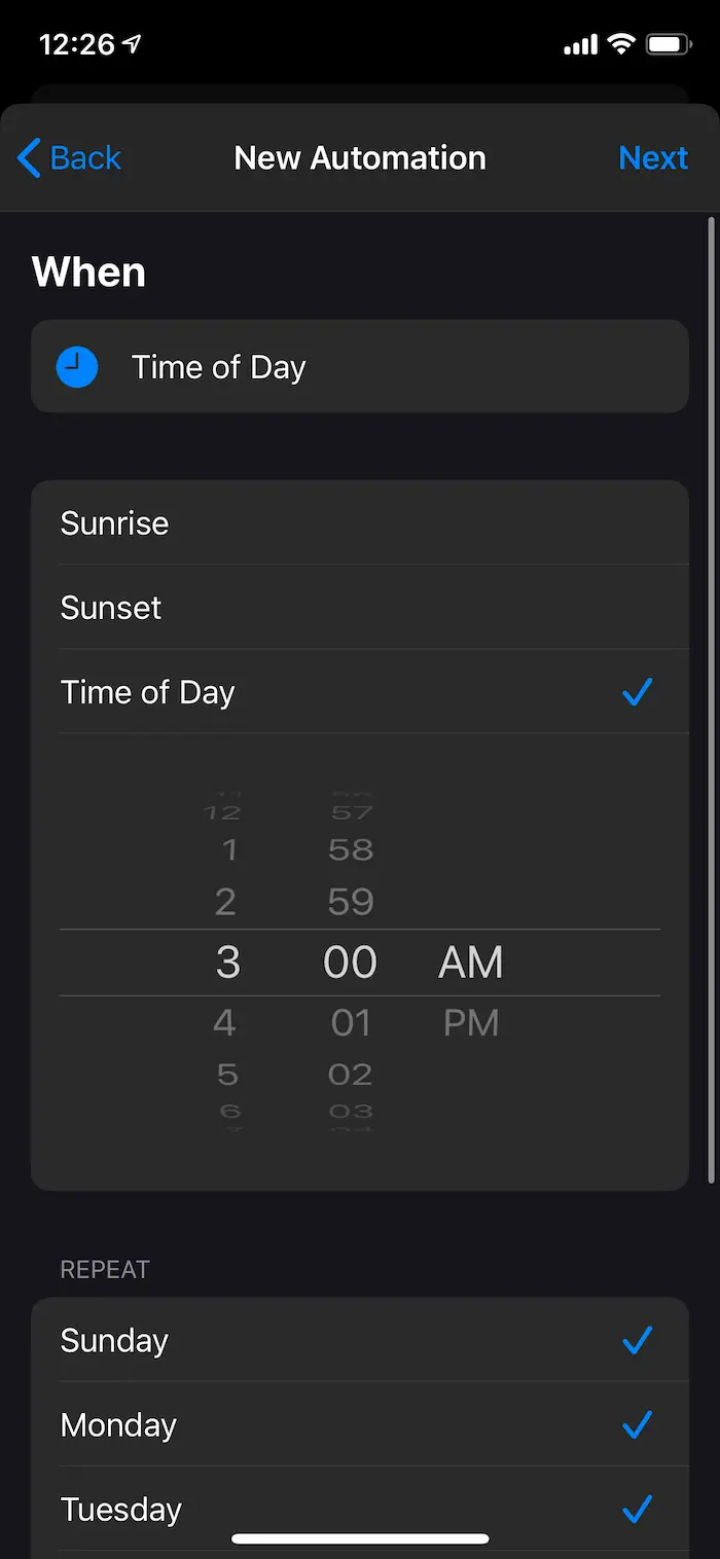
that's in the middle of the night
Click next, and on the next screen, you will have to add actions. Click on "Add action" and search for "Shortcuts" in the search bar. Select "Run Shortcut". Tap on the blue box next to the "Run" text and select the Shortcut we created earlier.
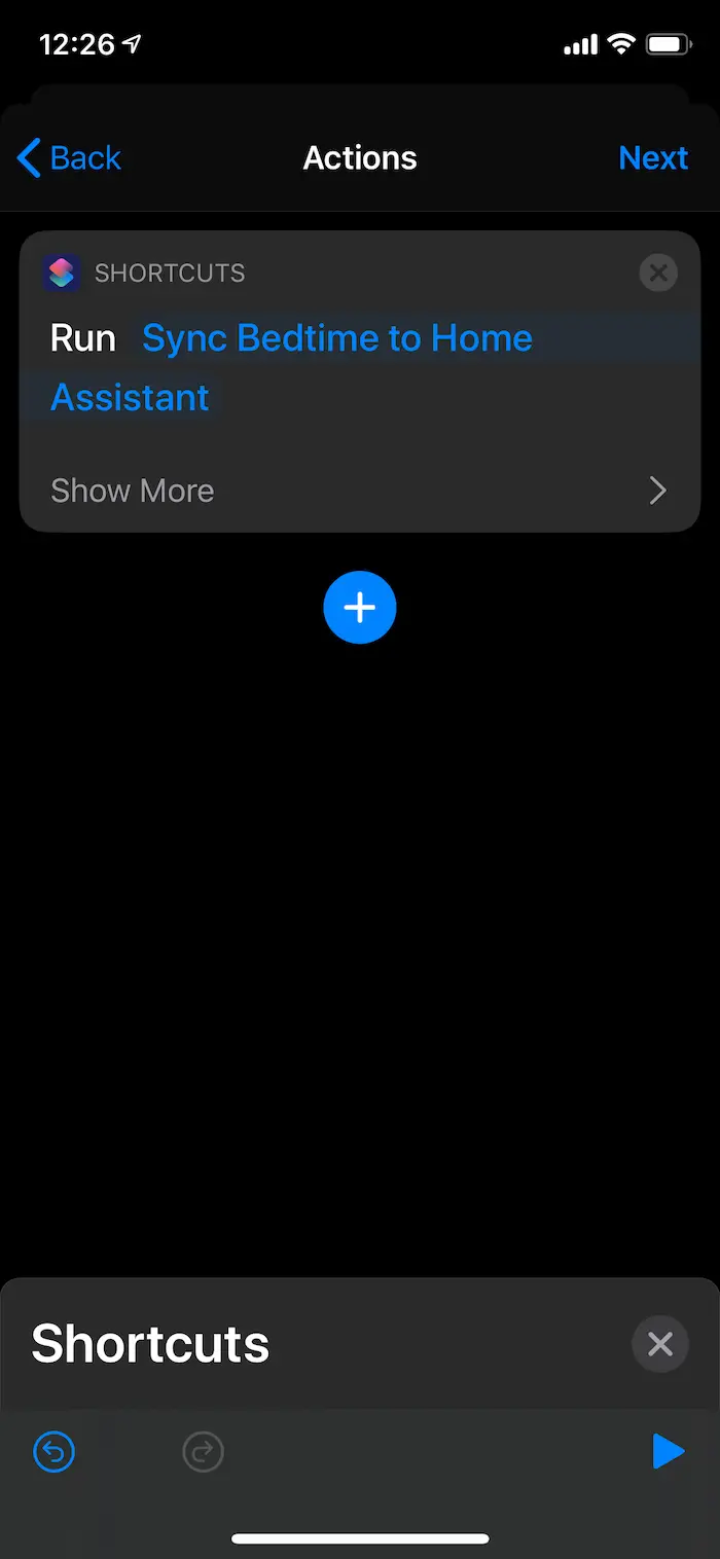
Click next, and then click done. That's it! The sync shortcut will now run once per day at the configured time.
The Home Assistant REST API
The Shortcuts app uses an HTTP request to send over the value of the alarm, but how does it do that? It makes use of the Home Assistant API, which is fully documented here. The part we are making use of is "POST /api/states/", as defined here.
The URL will specify an entity ID, which is set to "sensor.bedtime" in the Shortcut code. The request body will contain the "state" value, in this case, the time of the alarm. The important thing about this API endpoint is that if the specified entity ID does not exist, it will create it and set the state as defined.
This means that the "sensor.bedtime" entity does not need to exist before the Shortcut is first run, as making the request the first time will create it.
Home Assistant Automation
Within Home Assistant, we can now create an automation that will make use of this value to hopefully do something useful. The trick is that the value of the alarm is now the state of the "sensor.bedtime" sensor, which enables a vast selection of automation methods. We will demonstrate how to use this value by performing a gentle wakeup routine.
Creating the automation
First, go to the Home Assistant UI, then click on "Configuration". Then go to "Automations" and click on the plus symbol to add a new automation. Give it whichever name you like, and add a "Template" trigger. Now paste the following template code into it:
    {% set t1 = as_timestamp(strptime(states('sensor.date')+' '+states('sensor.time'),'%Y-%m-%d %H:%M')) | int %}
    {% set t2 = as_timestamp(strptime(states('sensor.date')+' '+states('sensor.bedtime'),'%Y-%m-%d %H:%M')) | int -(60*2) %}
    {{t1 == t2}}
The formatting will become one line, but that's okay. This template will run trigger the automation when the current time is 2 minutes before the set alarm time. Feel free to change the "60*2" to anything you like, "60*5" would trigger 5 minutes before, as an example.
Important: you must have the "date_time" sensor enabled for this to work. There are countless explanations as to why this is necessary. The short of it is that you need a sensor state to change for a value template to ever be evaluated, so simply comparing the alarm time to the current time would only ever trigger when the alarm time is updated.
To add the time sensor, simply add the following to your sensor config:
- platform: time_date
  display_options:
    - 'time'
    - 'date'
Then restart Home Assistant. Consult home-assistant.io/integrations/time_date/ if you need more help with this, we will assume you have this entity setup for the rest of this guide.
Next, add any conditions you may want. I added one to ensure I am home before trigger - you can simply leave conditions blank if you don't have any. Finally, add any actions you may want to have. Anything you put here will activate at the set time before your iOS alarm goes off.
Important: The steps listed here for gentle wakeup are only required if your light does not support a "transition" time natively. Mine did not and on top of that also has a bit of a lag problem that causes the light's state to always lag a second or two behind the real state of the device. If you have a light that behaves similarly, follow the next steps. Otherwise, specify an action with "light.on" and set a transition time to whatever you like!
If you are following the Gentle Wakeup example, we will use the "Event" action to fire an event over to Appdaemon. Specify "GENTLE_WAKE" as the event, and fill out the service data as follows:
end_level_pct: '255'
entity_id: light.mainlight
start_level_pct: '0'
transition: '00:05:00'
Ensure the "entity_id" is set to the correct entity, and that the transition is set to the time you want the light to take to turn on. That's it for the automation! If you aren't looking to use gentle wakeup, there is nothing more to do. Otherwise, in the next section, we will go over the Appdaemon configuration required to make this work.
The Appdaemon configuration
If you have never used Appdaemon, it is an integration for Home Assistant that allows users to write advanced automations in Python quickly. One of the many benefits is that while writing the automation, every time you update the .py file, the system will automatically reload the latest version of your code, making debugging really easy. We won't go over configuring Appdaemon itself, but it shouldn't be too challenging to do using the Addon store.
Within the "appdaemon/apps" directory, download and save gentle_wake.py. If you use a apps.yaml file, you can specify the app as follows:
gentle_wake:
  module: gentle_wake
  class: GentleWake
If you don't use that file, that config isn't needed.
Once Appdaemon reloads, everything should be set up to bring a light from "start_level_pct" to "end_level_pct" when the "GENTLE_WAKE" event is fired, as specified in the event data. The automation we created earlier fires that event which will start the dimming via this script. Credits go to mrsnyds on the Home Assistant forum for the base of this code. I have simply adapted it to use callbacks instead of blocking the main thread, as my instance would completely lock up otherwise.
Summary
That's it! The Shortcuts app on iOS is compelling and can allow for some creative automations to exist. This is a relatively simple application of the Shortcuts app, and I'd love to see if anyone has successfully used it to create more complex automations. Since they can send virtually any value obtained from an iOS device over to Home Assistant, the possibilities are nearly endless when it comes to what you can create.
