How to Easily Connect Siri to Home Assistant
Updated on 7th Sep 2020 13:31 in DIY, Smart, Tutorial
As with most things, Apple has its own protocol for smart homes. Personally, I do not find any of the current hub offerings to be worth purchasing, which is unfortunate because the software is pretty well designed. The Home app on both the Mac and the iPhone are super well integrated with Siri and other Apple services, so it would be really great to be able to connect it to your existing smart home. Lucky for us, with Home Assistant it really is super easy to get your Home Assistant devices into the Home app.

Table of Contents
Setting up Siri with Home Assistant
The configuration required to connect these two together is surprisingly simple to do, and should only take a maximum of 10 minutes. It should be noted that we are going to be configuring Home Assistant to share devices it knows about with HomeKit and not connecting HomeKit devices to Home Assistant. There is also a way to do that, but we will cover that in another article.
To begin, open the Home Assistant (HASS) panel and navigate to the "Configuration" page via the sidebar. From there, click on "Integrations" to go to the next screen.

Once on the integrations page, you will see a list of the currently installed integrations. Yours may look different to mine, but the important thing is to click on the little plus sign in the bottom right.

A little window should pop up with a list of many choices. Type "Homekit" into the search bar to filter the list and to display the one we are looking for.

Click on the "Bridge" option. Important: Do not use the controller for this! The controller is meant to control devices that are advertised as being "HomeKit" compatible and will not work for this guide. Once you click on the HomeKit Bridge option, you will see the following window prompting you to set up your bridge.

It will ask you if you want to enable Autostart along with the domains to include in the bridge. Note: The auto start must be disabled if you are using Z-Wave or any other type of device that can take a while to startup. If you aren't sure or have an integration that fits that description, untick that box, and we will explain how to deal with it in the next section.
Note: The "domains to include" allow you to select several general domains such as climate, sensor, and many others. The reason this dropdown exists is that as mentioned on the screen, there is a limit of 150 devices that can be bridged. With this in mind, be sure to only include devices you really need. In my case, I left the defaults and added "Sensor".
Once those settings are correct, hit submit. You will get a popup saying that the bridge will be ready soon and that you will be notified when it is ready to pair. Finally, it will ask you in what virtual room you want to put this entity, but as this is a virtual entity, I left it blank. When that's done hit finish.
Configuring the Home app
First, confirm that the HomeKit Bridge integration has been set up correctly by opening the Home Assistant notification pane via the "Notifications" button in the sidebar. There should be a message containing both a QR code and a PIN for use with pairing the bridge. If this doesn't appear, wait a few minutes and if it still doesn't work, try the steps of the last section over again.
Assuming you saw the QR code, open up the "Home" app on your iPhone or other ios device. If you have never configured your Home app, you will likely have to configure a few things before you get to the main screen. Don't worry too much about the settings for this configuration because it only affects the HomeKit side, such as the virtual rooms that are available to put devices in.
Once that config is done, you will see a screen that is mostly empty other than some text about building your connected home and a big "Add Accessory" button.

Click on "Add Accessory" to move to the next screen where you will be asked to either scan the device's QR code or enter the PIN manually.

Scanning is the quickest, but if that's not an option, go ahead and enter the PIN manually. This should be the PIN/QR code from the Home Assistant notifications pane. Once that is done you will likely get an "Unverified device" alert, just click "Add anyways" since this error is due to the lack of official certification on the Home Assistant side.
Once the bridge is paired, you will begin to be asked to tune each bridged device's settings for HomeKit. Simply set these to whatever is best for your set up as they are not critical to this guide. They do offer some exciting options, though. You can place the device in virtual rooms, set an icon to make it stand out, and even rename the device to something different than what it is in Home Assistant. Keep in mind it uses the entity ID from HASS to track each HomeKit entity, so don't go changing those unless you want to redo all these settings again.

One cool feature is that it will automatically suggest scenes that each entity could be a part of while you are configuring each one. Feel free to select any that look interesting, but keep in mind that this will be a HomeKit only feature and that scenes configured here will not be seen from Home Assistant.
When you finish going through all of the bridged entities, you will be back on the main screen. With any luck now you will be able to see all of your HASS devices listed! Try modifying a device's state by taping on it, if everything works it should change the state in Home Assistant as well. If this doesn't work, many things could be wrong, and so I recommend checking out the official troubleshooting guide.
Dealing with Autostart
The reason we have this extra step is that some Home Assistant integrations will have a delayed start, while still allowing the rest of the system to continue booting up. This is usually a good thing because it means that the entire system won't stop working simply because one device can't be reached. Unfortunately, in this situation, it also means that the HomeKit integration could be started before all of the entities have been adequately loaded, and this will cause them not to appear in HomeKit.
Worse yet, any settings you had will be gone when it syncs with HomeKit as the missing entities will appear to it as not existing anymore. The solution to this problem is to either delay the start of the HomeKit integration or to only start when an event indicating that the entities are ready is fired. Here is a method using a time delay which will work in any situation. The only problem is that it assumes that everything will be ready after 5 minutes which may not always be the case - especially if the host computer is a slower Raspberry Pi.
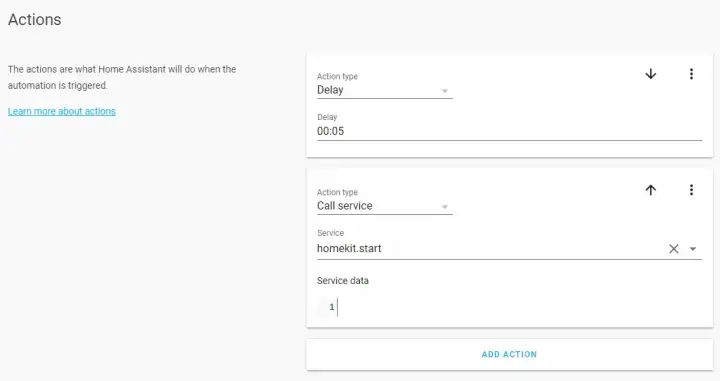
To configure this, on the Home Assistant panel, click on "Configure". Then click on "Automations" to go to the list of currently configured automations. Click the plus button to add a new one and hit "skip" if a window pops up asking for a sentence. Give it whatever name you want, then add a "Home Assistant" trigger type and select the "Start" event.
Next, add a "Delay" action with "00:05" as the value to set a 5-minute delay. Finally, add another action below the delay and set it to "Call service" with a value of "homekit.start". You should see it suggest things as you type the service name and hopefully, the HomeKit service will be one of the suggestions.
You now have a delayed HomeKit start, nice! There are many other possible configurations here, check out the official integration documentation to see some of the other examples. Those are mostly needed with Z-Wave and with unpredictable devices that sometimes take a long time, but they can also help start HomeKit faster if everything is ready before the 5 minute fixed period.

Using the bridge
Now you might be wondering, why would you want to use such a bridge when there is a perfectly good Home Assistant app? The real reason this is worth doing is because of the fantastic integration into other Apple services, such as Siri. An excellent example of this how the Mac Home app automatically syncs with the ios version, allowing a seamless experience across both machines.
Further to that, it is also wonderfully integrated with Siri. By default, Siri will understand how to do a lot of things involving your smart home, try saying "Hey Siri, turn on ", where the name is the entity name set in Home Assistant (unless overwritten in the HomeKit settings). Siri will very quickly respond and perform the requested action.
Personally, I have honestly never seen a voice assistant respond so quickly to smart home commands. Alexa did not even come close to the speed that Siri was able to achieve. I'm not sure why Siri is so much faster but let me know in the comments if you have also noticed this, as to me the difference is substantial. There are also plenty of other HomeKit features that you can take advantage of and will complement Home Assistant nicely.
Watch integration
It should be mentioned just because of how convenient it could be that HomeKit also works out of the box on the Apple watch. The functionality is provided both through the watch version of Home app and the watch's built-in Siri, which can also control any smart home devices. While it isn't anything extraordinary, the no effort watch integration can be useful to make a quick change, like turning on a light, without having to pull your phone out of your pocket.
Summary
With all that, the HomeKit experience is honestly quite pleasant. Keeping in mind that I've never used a HomeKit controller and that all of this is purely from an interface/remote control perspective, I really like being able to add it to Home Assistant. The UI is smooth, Siri responds super fast and performs smart home actions quickly, and the synchronization between Apple devices is really lovely.
If you are using Home Assistant and already own Apple products, set up this bridge today! It costs nothing and will gain the ability to control all of your devices via Siri. It will also give you a synchronized list of devices, scenes, and other settings across all Apple devices as a native integration.