How to Use NFC Tags As Powerful Home Automation Sensors
Updated on 20th Nov 2020 17:03 in Home Assistant, Smart, Tutorial
Smart homes often include little quality of life improvements such as automatically turning off the lights after everyone has left a room or reminding you of certain things. A challenge regularly faced by homeowners is the method of detection for determining that a certain situation has occurred. Sensors provide good feedback but are often hard to get in the right place or are simply too difficult to install in a certain location. Enter NFC, a technology that can embed an action into a sticker that can be placed anywhere!
Disclaimer: This post contains affiliate links. As an Amazon Associate, I earn from qualifying purchases.
Table of Contents
What is NFC
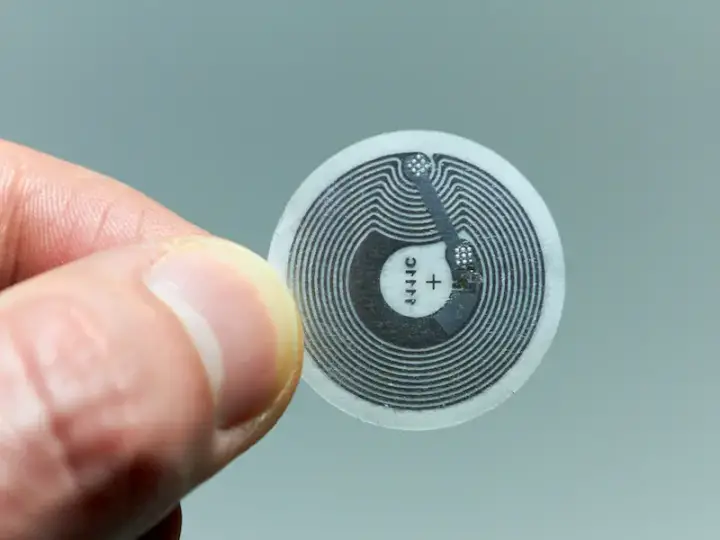
NFC stands for Near Field Communication and is typically used to transmit information over tiny distances of up to around 10 centimetres in good situations. Most people will know it from the "tap" function that most credit cards support. The card is transmitting information to the reader that allows it to determine which account to bill the payment to. An interesting modern feature is mobile phones that can mimic the signals emitted by a card, allowing your phone to pay for things. The reason this is possible is that modern phones include an NFC antenna that allows them to perform such as task. Here we are indeed talking about the same technology, but we are going to use the phone primarily as a reader instead of a transmitter like with credit cards.
What can it be used for?
NFC tag home automation can be used in so many different creative ways that the sky really is the limit on what you can come up with. Although the tags can only store roughly 96-8192 bytes, that's more than enough to store a unique identification number that a smart home controller can recognize as being a certain action. The thing to remember is that tags can act as an input to your system just as a button would. They can be "activated" by being scanned just the same as a button would be pushed, though there isn't a good way to detect the length of the scan unlike the length of a button press.
The advantages of NFC are pretty big. Unlike a button, tags are easily placed in various locations and can be uniquely identified without any wiring or networking nonsense. Some uses could include triggering a scene, registering presence such as if you are in bed via a tag on your nightstand, or even acting as a next song button when scanned. The biggest benefit is probably the fact that unlike almost every other type of sensor, it is super cheap to use as there is only the cost of the tags involved. The drawback is mostly that they have a higher detection failure rate than most physical solutions as scanners can be a bit fussy.
How to use NFC tags for automation with iOS
We should start by noting that Android has similar capabilities, but we will demonstrate the technique using iOS as that is what I have on hand. Now even though the required version of iOS (13.1) is supported on many models, this won't work on all of them as only newer models have the needed hardware. In fact, the ability to scan tags in the background only works with iPhone Xs and XR or higher, which isn't documented in many places but is critical for this to work. We will be using Shortcuts on the phone and Home Assistant as a smart home controller, but keep in mind you can likely use many other systems just fine.
Bill of Materials
There aren't many materials needed to get started, which is one of the benefits of NFC. In reality, the only materials strictly required are the tags themselves and a compatible smartphone. The items listed here are required to follow along, but there are almost certainly ways to get it done without these specifically.
- NFC tags, such as these on Amazon
- a mobile phone, iPhone Xs/XR or higher to follow with us
- a Home Assistant instance (for the next section)
Programming the tag
The first step to using an NFC tag is to program it. Make sure you have the tags on hand before starting and try to keep track of which tag you are working with as it is easy to forget which is which (they all look the same). Start by opening the Shortcuts app and going to the "Automation" tab. From there, click on the plus sign in the top right and click on "Create Personal Automation".
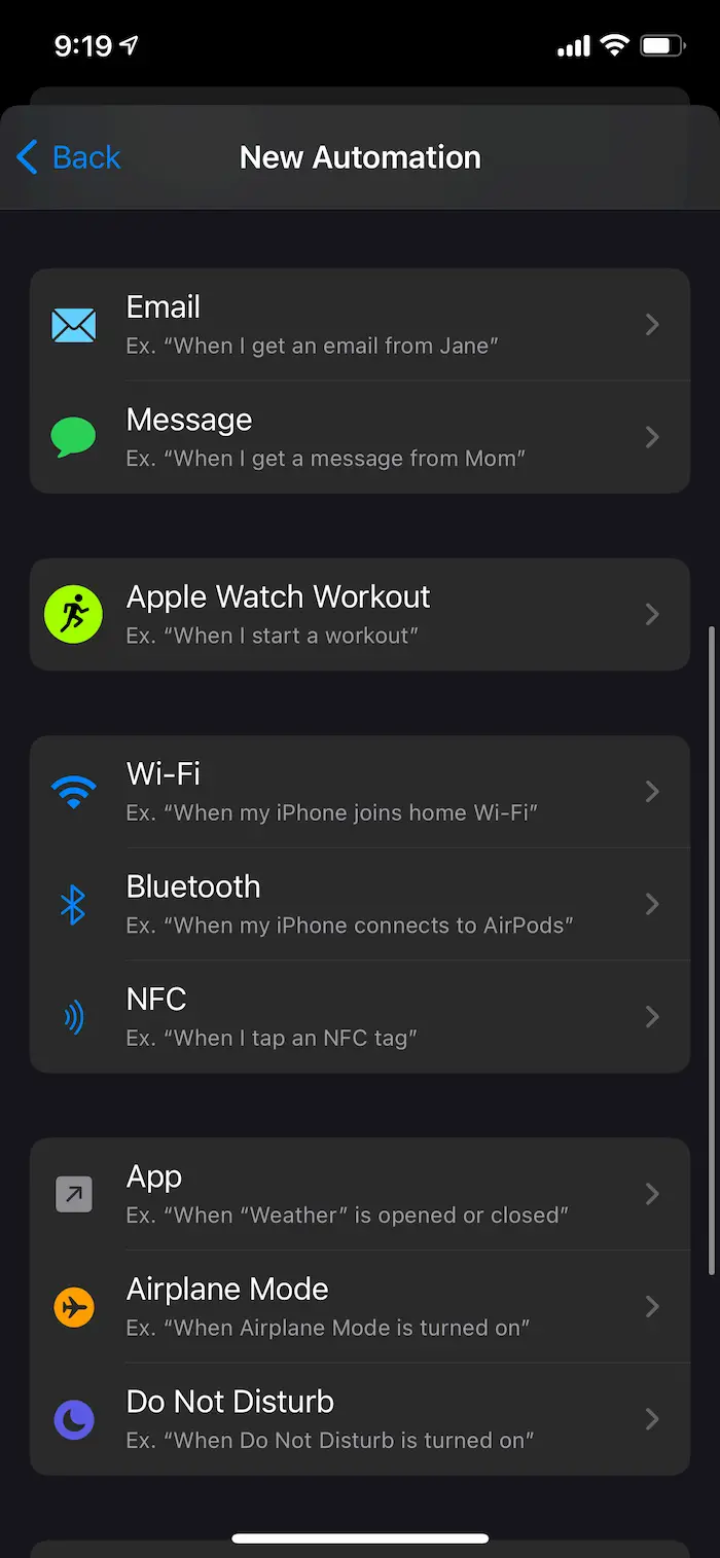
Click on "NFC". Now you will want to click on the scan button and scan one of your NFC tags - be sure to remember which one!
Once you scan it, a popup will appear asking you to name this tag, pick a name you like.
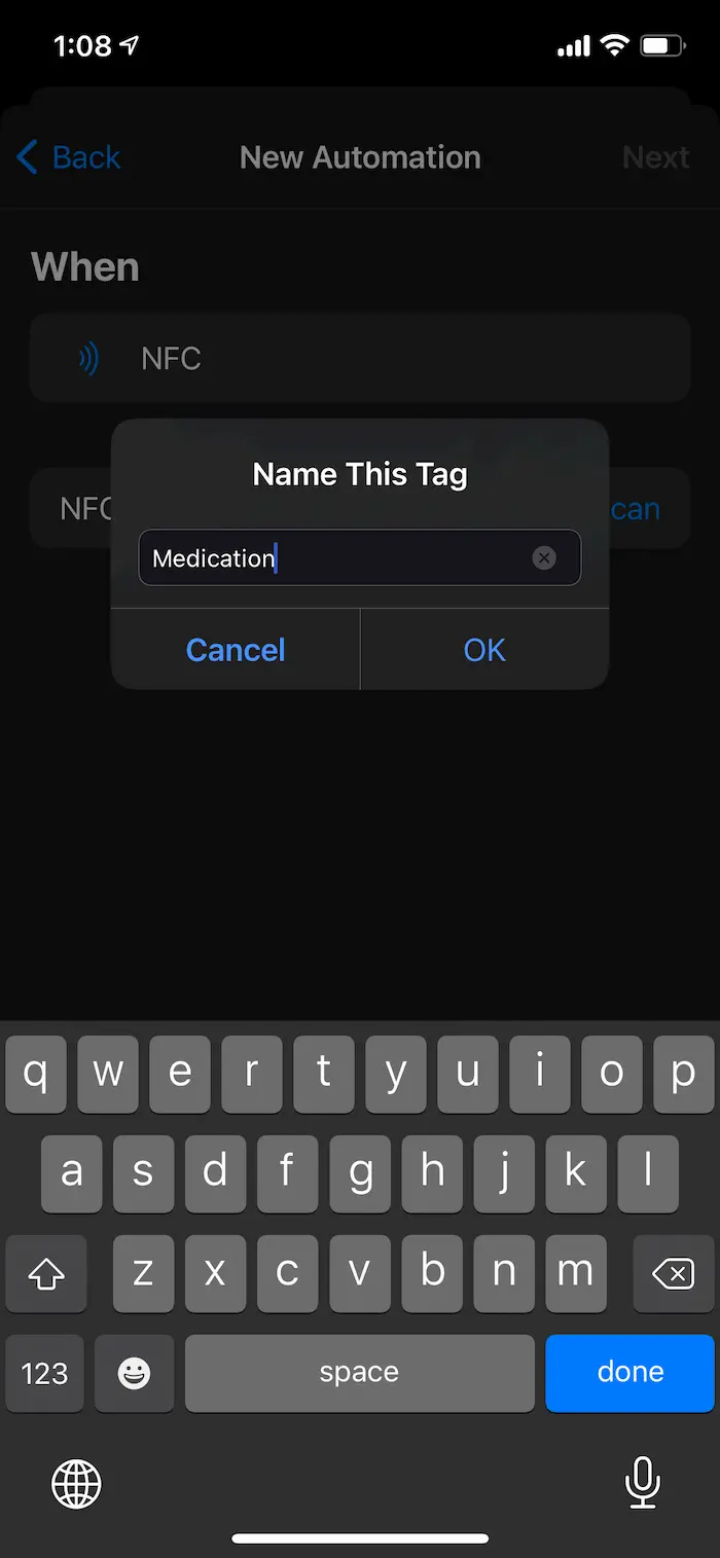
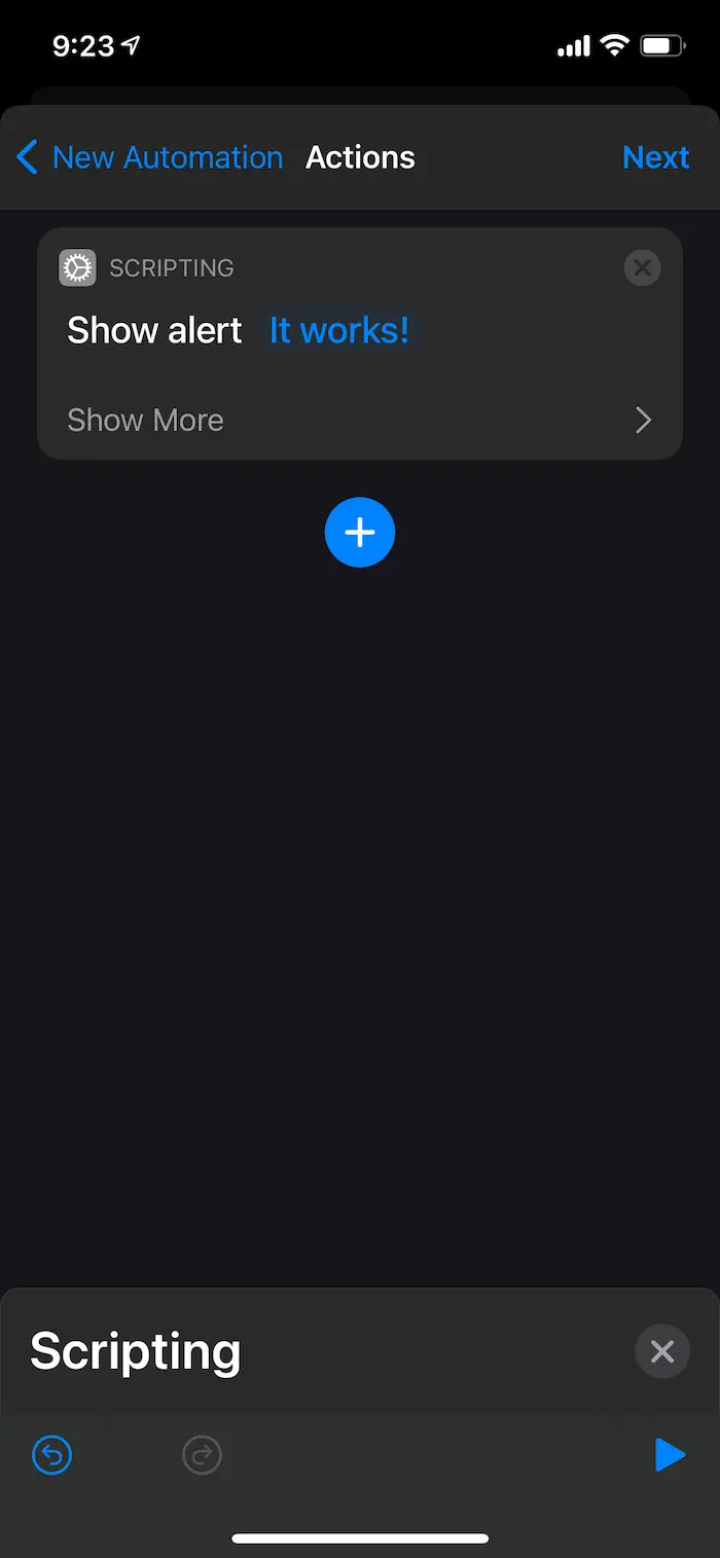
Click on "next" in the top right to change to the next screen. Here you can add actions to be run when the tag is detected. I just added a "show alert" action to demonstrate the process.
Click on "next" in the top right to move to the final screen. Be sure to untick "Ask before running" to get the best experience - otherwise, you will have to click a notification before anything happens.
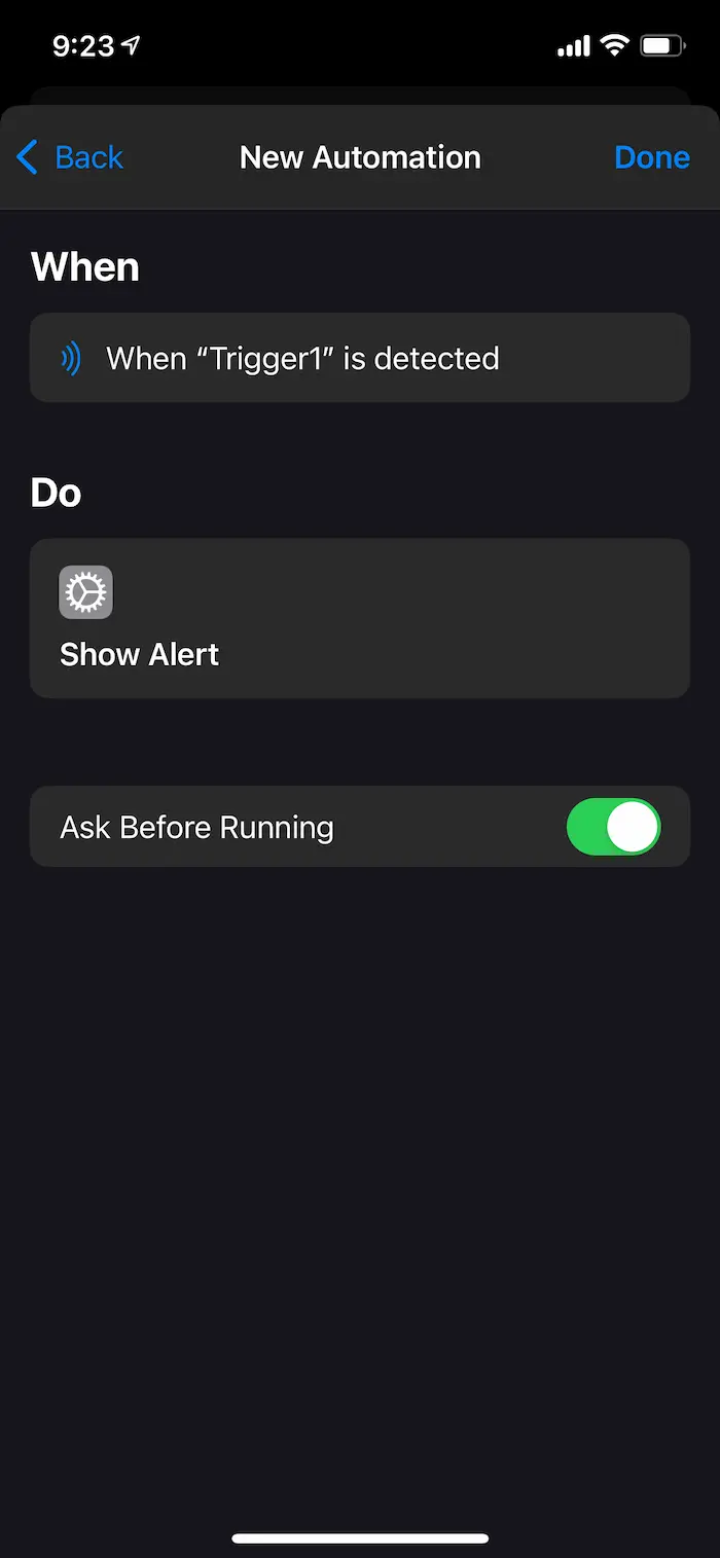
Click on "done", and we are all done. Scan the tag again, and you should see the alert appear! That's it; now you know how to use an NFC tag to create an automation in iOS. In the next section, we will create a complete example of an NFC tag being used to control a smart home.
How to use NFC tags with iOS and Home Assistant
Now we will explore something a bit more advanced. We're going to create a reminder system to keep track of the amount of medication remaining in a bottle. With an NFC tag on the lid, when you take one, you scan the tag, and the system does the rest. Using both the Shortcuts app and Home Assistant, we can create this system rather easily. It's probably possible to do this using only the Shortcuts app, but the goal is to demonstrate how NFC tags can play into home automation via a controller. This assumes you have both a Home Assistant instance running and the Home Assistant app on your phone - check out this article if you want to install Home Assistant.
Warning: while the system we build will most likely work well, you should never rely on it for critical applications. Rather, it should complement an existing solution that can be used as a fallback should something go wrong.
First steps
The first step is to follow the instructions under How to use NFC tags for automation with iOS, as everything up to the point where we specify the actions of the Shortcut is identical to what we are doing here. I named my tag "Medication" for this section, but feel free to choose the name you like. When you get to the part where you specify the actions to run, stop following the previous section and continue here.
Sending events to Home Assistant
Thanks to the Home Assistant app, this step is trivial. Add an action by clicking on the plus sign. Then search for "Home Assistant" and the app should appear. Click on it and tap on the "Fire event" action.
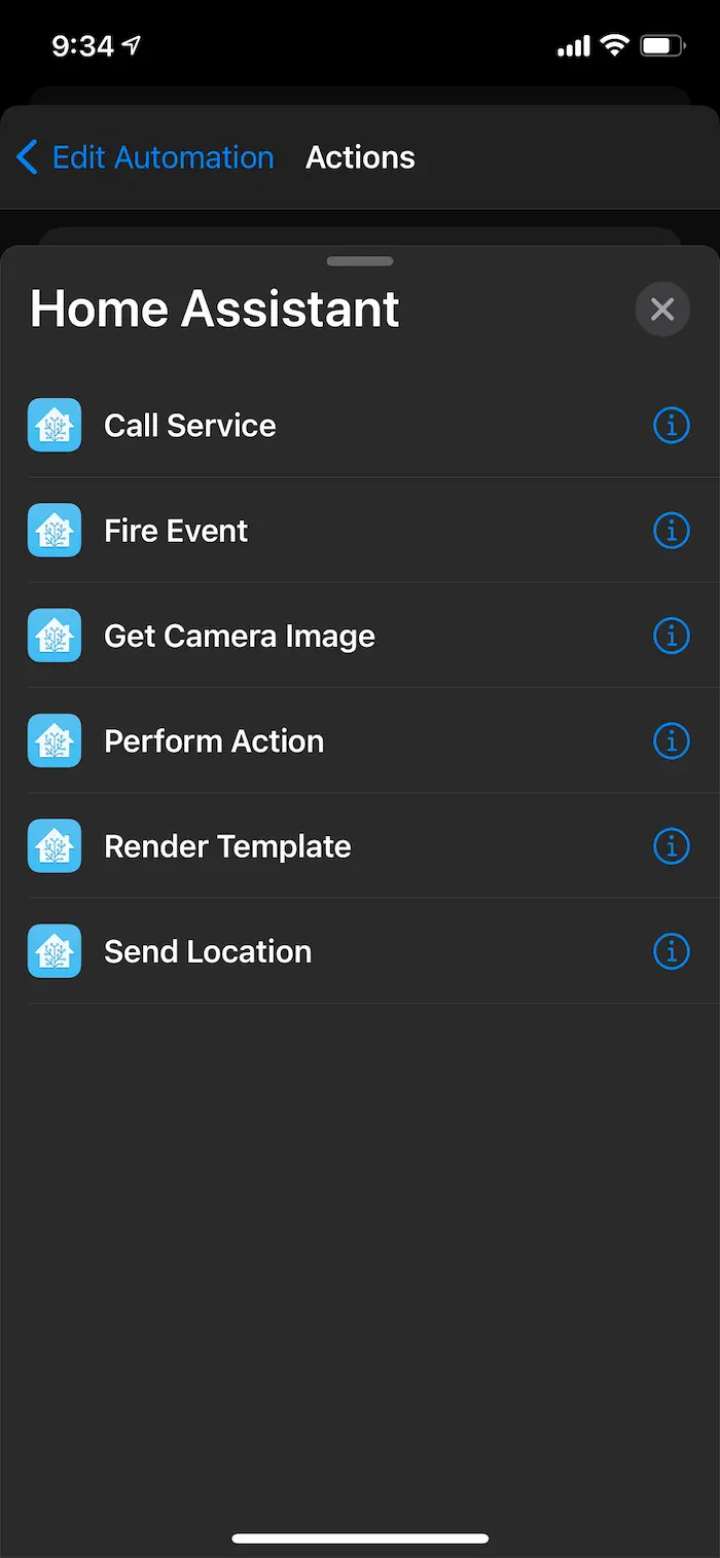
The action should be added to the timeline of events within the Shortcut. Tap on the name of the event (displayed in blue) and change it to something more fitting - mine is called "medication_scan".
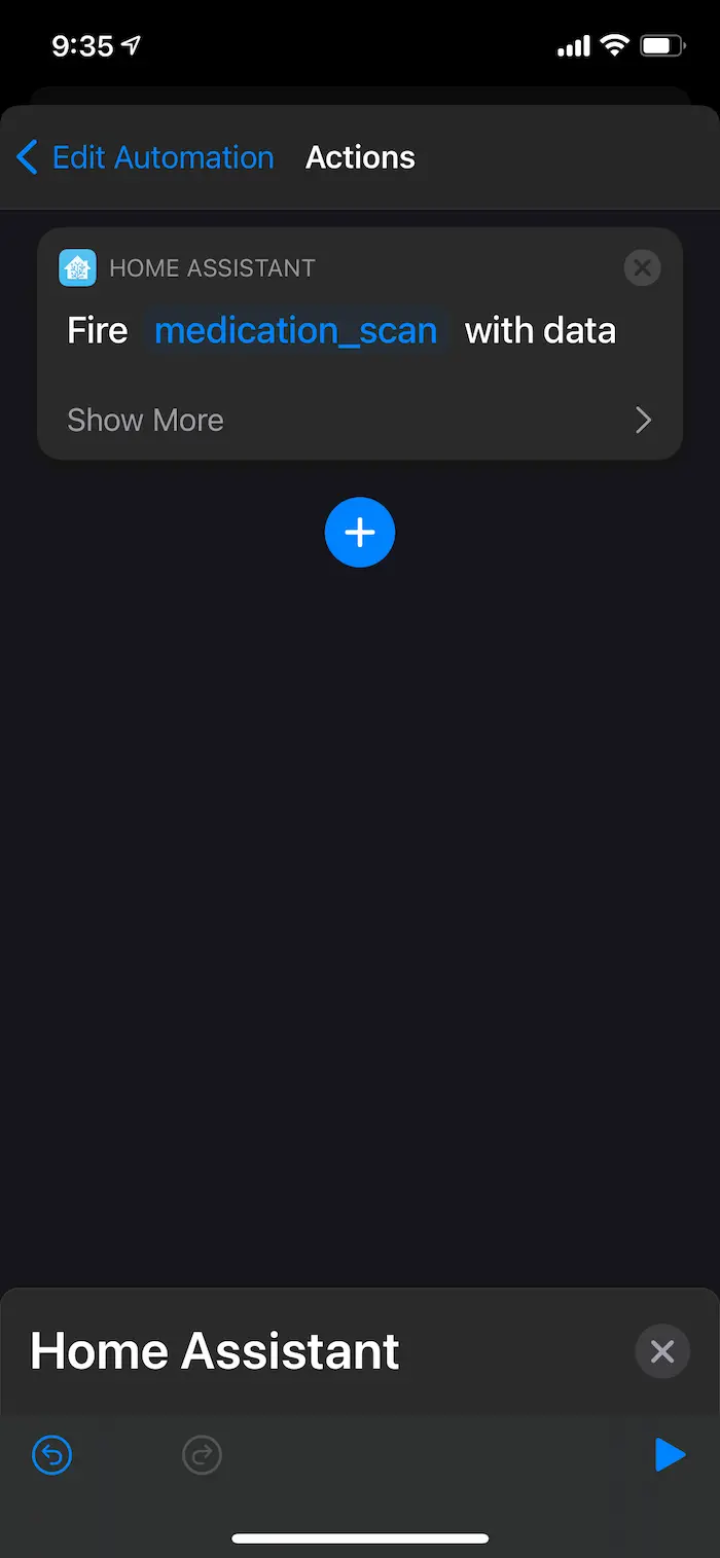
That's it! The automation is now configured to dispatch an event when you scan the tag. You can test it by logging in to the Home Assistant UI and going to Developer Tools->Events. In the form that says "Listen to events" type in the name of the event you entered in the shortcut and click "Start listening". Now when you scan the tag, a log message should appear on the UI - success! If it didn't work, try clicking the play button in the Shortcut actions page, as that should run it directly.
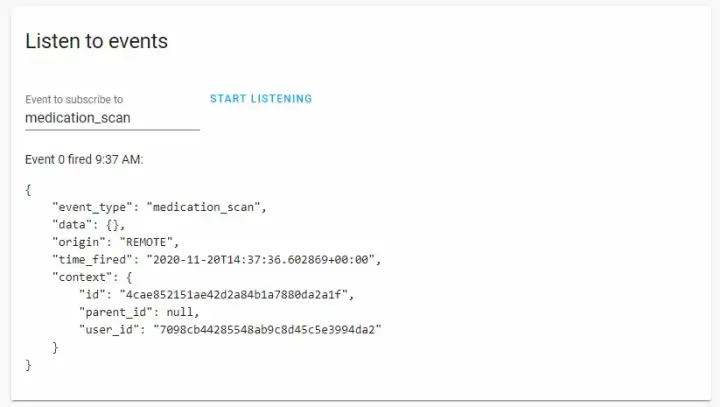
Configuring Home Assistant to respond
Now that we have an input trigger for our event, which happens when we take 1 medication, we can use that to keep track of our supply using automations. We will do this with the help of an "input_number" helper and two separate automations. First, let's configure the helper. Head over to the "Configuration" tab in Home Assistant, then click on "Helpers" in the menu. On the new page, click on the "plus" in the bottom right and select "number". Add the following settings and adjust them as you see fit for your use.
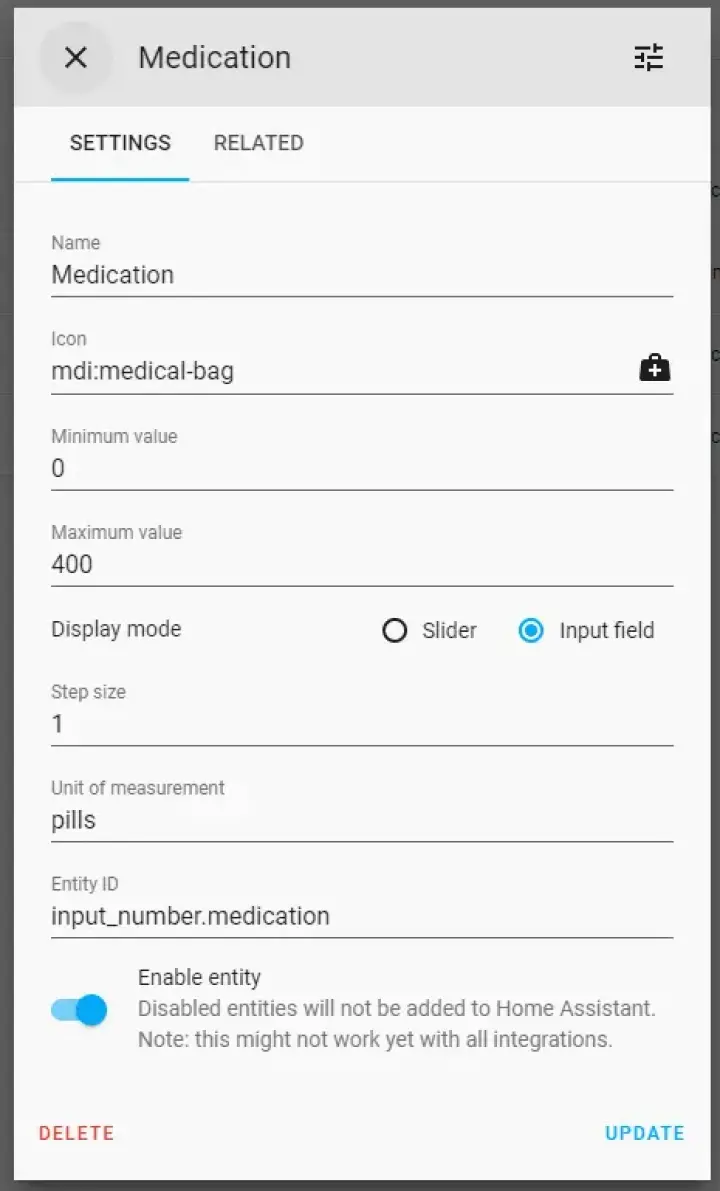
Click on the "Create" button to save your changes. We're done with the helper!
Creating automations
Going back to the "Configure" tab, click on the "Automations" button. From here we will create 2 automations. Add the first by clicking on the plus sign. For the first one, we will create a response to the event we created earlier firing. Name the automation something fitting and add a trigger type of "event" with the same "event_type" as the name you put in the Shortcut. Then specify your action as being "Call service" with "input_number.decrement" as the service to call. Then specify the name of the helper you created earlier under "entity_id".
When it's all done, it should look something like this:
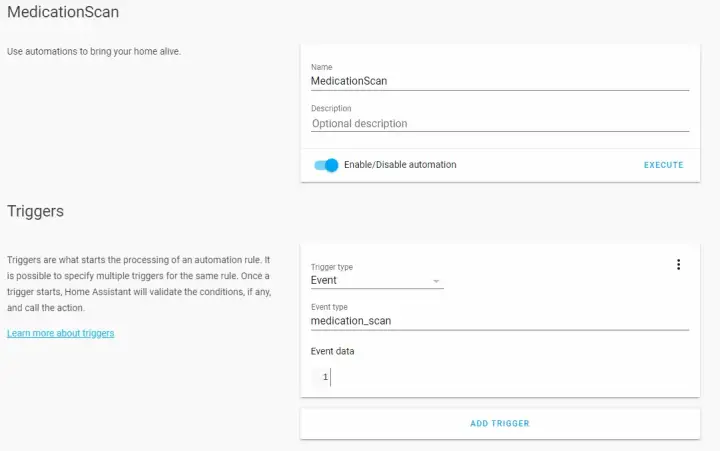
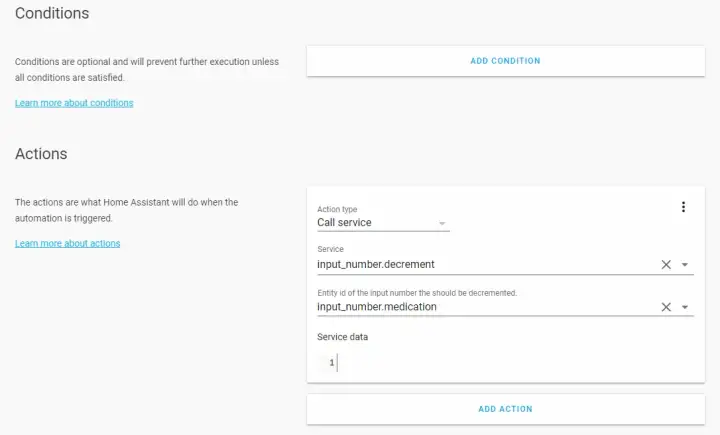
That's it for the first automation.
The second one will be for the reminders so that we get a nice little notification when we need to refill our medication. Create another automation and name it something like "MedicationReminder". The trigger will be "Numeric state" with the entity being the same helper as earlier. Pick a number you want to use as a "low" threshold; I have it set to 64 for testing. Finally, add an action of type "Call service" and make the service "notify.<yourPhone>". Add a message to display when it gets triggered.
When it's done, it should look something like this:
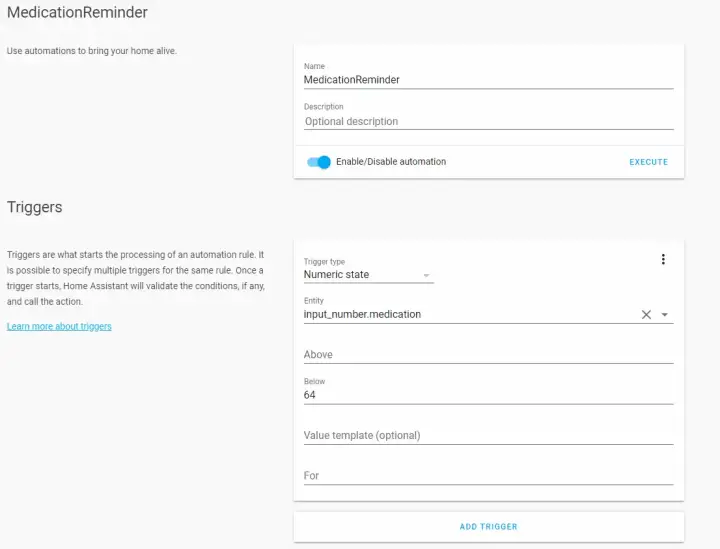
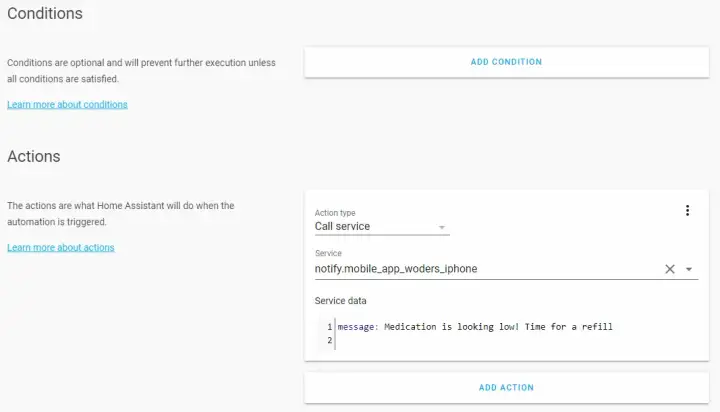
That's it; you're done!
Final touches
Now make sure your input_number helper is displayed on the UI. Then set the number to something one higher than your low threshold and scan the NFC tag with your phone. It should decrement the number and dispatch a notification to your phone, awesome! Obviously, this system is very rudimentary. Despite that, it should demonstrate how NFC tags can be used with a smartphone to create an input to your automations. There's plenty of situations where you could use a scan as an event to trigger a certain action, this being only one example of that.
Summary
Overall, NFC tags are awesome because they allow a cheap way to trigger events in a smart home. They can be used to send all sorts of events or track various things, and since you can get a pack of 20 tags for half the price of a commercial internet button, they are economical too! They aren't perfect for everything as miss-scans do happen and the detection can be a bit delayed, but for some applications, they are excellent and provide a great way to get creative.
