HomeKit Presence Detection: Why You Might Want To Check It Out
Updated on 14th Jun 2021 00:49 in General, Smart
Presence detection is commonly used in smart homes to identify who is currently at home. At first glance, this information might seem cool but have a limited number of practical use. In reality, this feature allows you to create some seriously awesome automations that help you save a ton of time. For example, you can configure your smart home to turn off the lights and make sure all the doors are locked once you leave the house.

Table of Contents
How does presence detection work on HomeKit?
You might be wondering how presence detection works, and you might actually have never noticed that such a feature exists in HomeKit. This is because, as with many things on the HomeKit platform, almost everything required to make it work is hidden away. It's important to remember that in this case, "HomeKit" refers to a network running with an official Apple controller, such as a HomePod. So how does it work? Each iPhone connects to iCloud, which is used to store data, send iMessage, and perform many other daily tasks.
You will find that by default, your phone transmits its general location to iCloud for additional processing. This allows the system to identify patterns such as where your home is located. If you open Apple Maps and are able to type "Home" as a destination, you are good to go! Otherwise, make sure to put your address on your contact card. Keep in mind that most of this will only work if you have location services on and that the iCloud features vary greatly depending on your account, the phone, and a ton of other things. It works because your phone can detect when it enters or leaves your home area (normally a small circle around your house, to account for the backyard, driveway, and other things nearby).
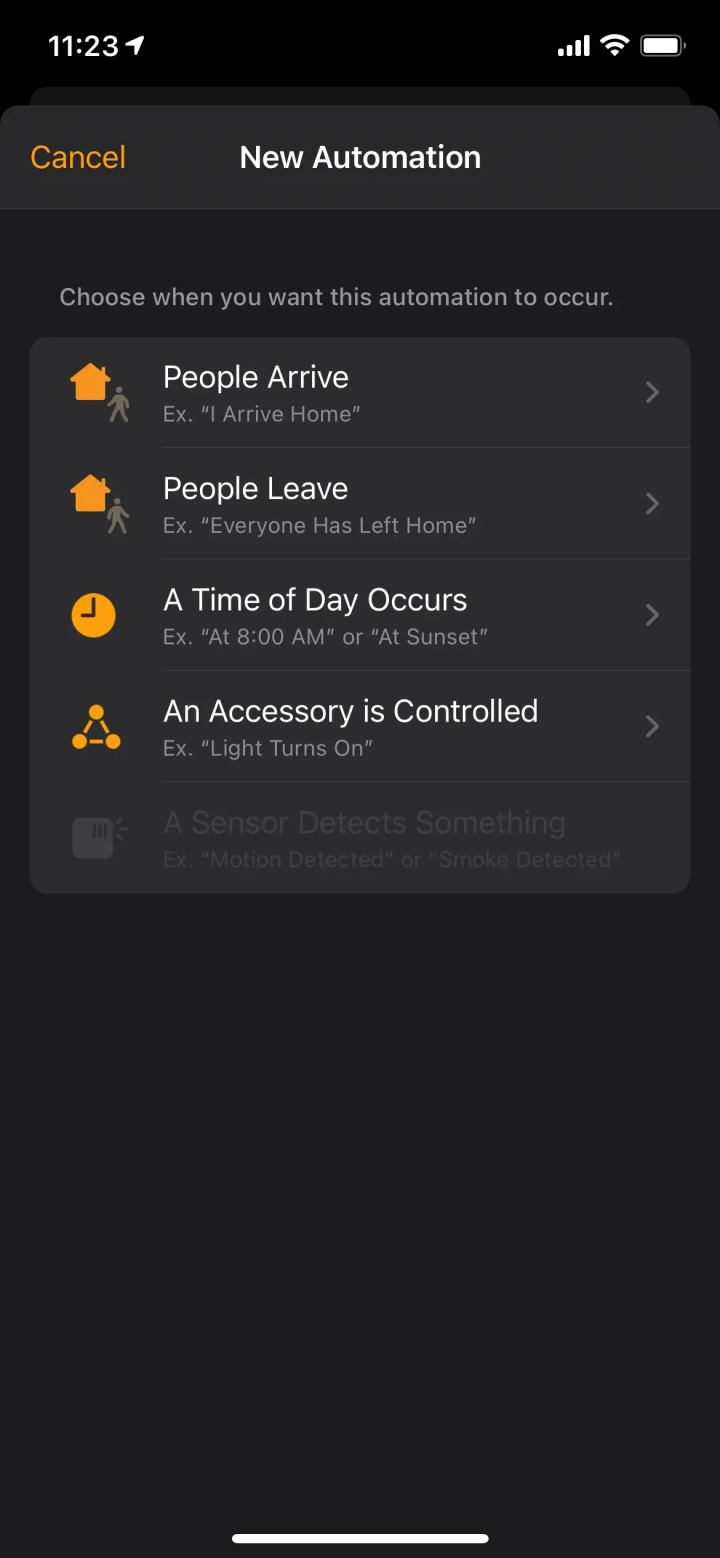
Within the Home app, you can see the option to use "People Arrive" or "People Leave" as an automation trigger. These are automatically configured to trigger the automation you set up when your phone leaves or arrives home. An important note for this feature is that you need to make sure your iCloud account is only set to use your primary phone's location. If you have a stay at home iPad, you need to be careful to ensure it isn't the one iCloud is using to determine your location. You can check this by going to Settings -> Tapping on your name at the top -> Find My. Here you should see a "My Location" field that shows "This Device", check to make sure your other devices aren't set to "This Device".

Problems with this method
Unfortunately, there are quite a few common problems with this approach. Most notably, HomeKit is notorious for being extremely finicky with presence detection, to the point where the most common solution is just to restart your devices. This might not be that bad if it weren't for the fact that there are extremely limited options to customize your automation triggers. If you open up the Home app and head over to the automation tab, you will notice that there are options (two as of writing) for "People Leave" or "People Arrive". You can specify which person you want to use as the trigger, or you can even select "Anyone" or "Everyone".
It's important to keep in mind that this option will be unchangeable from "Anyone" if you are the only member of your HomeKit network. You can also set the location to anywhere you like, along with the time. These settings are useful for configuring different actions based on the time and the location. For example, you can configure your trigger to turn the lights on when you arrive home but only between 5pm-10pm since it would be rude to turn the lights on if you arrive later and people are sleeping. As you can see, these few settings allow significant flexibility to create virtually any kind of "set and forget" automations, like locking the doors on your way out.
Once you configure the trigger, you are free to select what should happen when the automation runs. This can be as simple as turning on a few devices or as complex as running a shortcut (from the Shortcuts app). So what's the big deal? These options seem decent. The real issue comes from the fact that presence detection is done via iCloud. That means that anyone that doesn't have an iPhone (maybe an Apple Watch could work though...) will be effectively untrackable in this manner. In most cases, this is the real deal-breaker as many use HomeKit without everyone necessarily having an iOS device to control it.
Consider a home where both parents have an iPhone. They use their phones to do things like turning on or off the lights, checking that the door is locked, or adjusting the temperature remotely. They have kids who come home before them, but they have androids or some other device. As it stands, it would be impossible to create an automation for when they get home. There are tons of scenarios where something similar could happen, and the specifics aren't that important. What matters is that unless everyone uses an iPhone, there will simply be no way to use these features.
Presence detection for HomeKit solutions
As far as the reliability issues are concerned, there isn't much an end-user like you can do. The only remedy is to use a workaround until Apple fixes the problem on their end. Customization issues and compatibility, however, can be dealt with in a DIY project. There are two main aspects to consider with this solution: 1) a way to detect presence and 2) a way to send triggers to HomeKit. To learn more about the various ways presence detection is done, check out my article about presence detection here. You'll notice HomeKit uses the "Smartphone" technique, which is flawed for reasons we explored earlier.
The options I recommend are either network scanning or router client list. These two are relatively easy to set up and will detect devices from any manufacturer, as long as they use your WiFi network. How to configure and install each one is beyond the scope of this article but will be covered in a future post. In either case, the method is not infallible, but it does provide the advantage of not requiring specific devices to work. So that's how you can detect people's presence. What about actually doing it and sending this data to HomeKit? If you need a brush-up on how you can add virtually any device to HomeKit, check out my article on adding non-supported devices to HomeKit here!
To make a long story short, the best way to send this information to HomeKit is to have your detector appear as a sensor. Software like HomeBridge or the HomeKit plugin for Home Assistant (HASS) allows you to do that. Personally, I use a router client list parsing plugin for Home Assistant, which periodically fetches a list of all currently connected devices. I then configured the Home Assistant device tracker with the information about which device should correspond to which person. Now, when my phone disconnects from the WiFi network, HASS will mark me as away.
The final step is that Home Assistant exposes a boolean sensor (either "on" or "off") which represents the at-home status for each person. This is obviously far beyond the scope of a simple HomeKit configuration, but the reality of presence detection is that it just can't be done simply. If you are interested in seeing more details about how HomeKit can work hand-in-hand with a system like Home Assistant, check out my article on doing it in 3 easy steps here.

Recap: Pros and Cons of using HomeKit presence detection
You might have noticed that all of this is pretty difficult to understand, thanks to the seemingly never-ending list of factors. In this section, we are going to boil everything down to the core concepts. While all of this is accurate, the specific factors that influence your choice could differ from mine. That's why I recommend trying to understand what's going on behind the scenes, so you have better chances of picking the right thing for you.
Pros
- Easy to setup
- Easy to maintain
- Can have multiple location triggers
- Can configure triggers based on time
Cons
- Dependent on the Apple ecosystem
- Can be finicky, requiring restarts, and other workarounds
- Trigger customization is fairly limited
- Requires iCloud and internet to work


